There are more than one way to mix your paints. Most of us just mix the two or more colors together on a palette, then apply it to the surface we're painting on and call it a day. But really, there are many different ways to mix your colors. Here are a few of the main ones:
Read MoreDemo: Adding warms/cools AFTER the fact...
Color temperature was always confusing to me. I didn't "see" it - when an instructor would say, "do you see those warm yellows there, and the blue in that shadow there", I was honestly lost! I didn't see those colours! It took years of training (and I'm always learning and growing as an artist so the training continues) to teach my brain to see the way an artist sees. This is something you CAN learn :)
Here is a very simplistic example of how you can work on a piece, ignoring temperature at the start - and then add it after the fact.
Read More"Warming" up Color Temperature in a Painting
If, after painting a piece, you decide you wish it felt "warmer" - you can always glaze over it after it dries. This is possible with acrylic and oil paintings, but a little tougher to do on watercolors (though not impossible, just use a light hand and make sure you don't go over thick, granulated areas of paint).
Read more...
Read MoreWhat Should I Do With The Background?
When painting from photos or from life, you are the one who gets to decide what stays and what goes in your work. If you have a photo of a scene you'd like to capture on canvas, but feel that the background is too distracting - replace it with another background or edit the existing background to work better. Just make sure that it's contextually relevant and that it doesn't detract attention away from your main subject. Read more to find out some options on how to do that...a
Read MoreCleaning your New Wave Acrylic Palette
One of the best tools in studio is my New Wave Easy Lift palette, perfect for my acrylic paintings. If the paint dries in thick globs, it's a breeze to just peel it off - but most of the time I find that I'm using all of the paint and only a thin skin of paint is left behind. If I use my palette knife to scrape the paint off, I'm left with scrapes and streaks on the surface of the palette! What's a gal to do?
Read more...
Read MoreDrawing Tools and Surfaces
This month I started my Atelier classes at Cole Gallery in Edmonds. The first four-week session is all about Drawing! So with that in mind, I created this blog post all about my favourite drawing implements and surfaces to share with you all the fun options you can explore when sitting down to sketch and draw.
Read More
Color Wheels and Systems

The Munsell Color Wheel.
Color is such an amazing thing. It's crazy to think that it's just an effect of different lengths of the light spectrum that bounce off of objects in such a way as to make us see color.
There are a few different kinds of color wheels out there to try to help us make sense of this vast amount of information!
Munsell Color Wheel. This wheel takes color and splits it into three elements: Hue (what color is it?), Value (how dark or light is it?), and Chroma (how bright or dull is it?). It is the most widely accepted color system, and the one most of us use to determine our palettes (for example; complimentary colors are opposite on the wheel, and you can group colors based on where they fall on the wheel and know they'll always work together).
There are even 3D versions of this wheel that can help you with all three elements of color. They can be a lot of work but incredibly valuable as a learning and resource!
Quiller Color Wheel. This is a very handy, practical version of the Munsell Color Wheel that was developed by Stephen Quiller. He uses the actual names we find on the tubes of paint to reference where they fall on the color wheel. This can also help students evaluate the color temperature of different tubes of paint more easily!

CMYK
Process Color. This four color system is what most printers use on their presses. The colors consist of CYMK: Cyan (light bright blue), Yellow, Magenta (bright pink), and Black (shortened to "K"). These colors are printed in tiny, overlapping dots or hexagons to create the appearance of a mixed color.
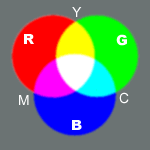
RGB
Additive Color. Also referred to as RGB (Red, Green, and Blue) this is the main color system when using light to create color. TVs, Computers, Movie Projectors and such all use this system. When all three colors are combined, they make white!
These are just some of the main color wheels out there, but there are more - explore the world of color through some amazing books or online resources! And if you'd like to jump into the deep end of the pool with me, join me for a color workshop: I have an Intensive Color Theory workshop coming up in November, 2014.
My Favorite books on this subject:
- Color, by Betty Edwards.
- Color and Light: A Guide for the Realistic Painter, by James Gurney.
- Color Choices: Making Color Sense Out of Color Theory, by Stephen Quiller
- The Secret Language of Color: Science, Nature, History, Culture, Beauty of Red, Orange, Yellow, Green, Blue, & Violet, by Joann Eckstut and Arielle Eckstut
About the back of your work...
Ah, the poor back of a painting. It can be sadly neglected by many of us who don't have our work framed. But why not use its valuable real estate for something more interesting?
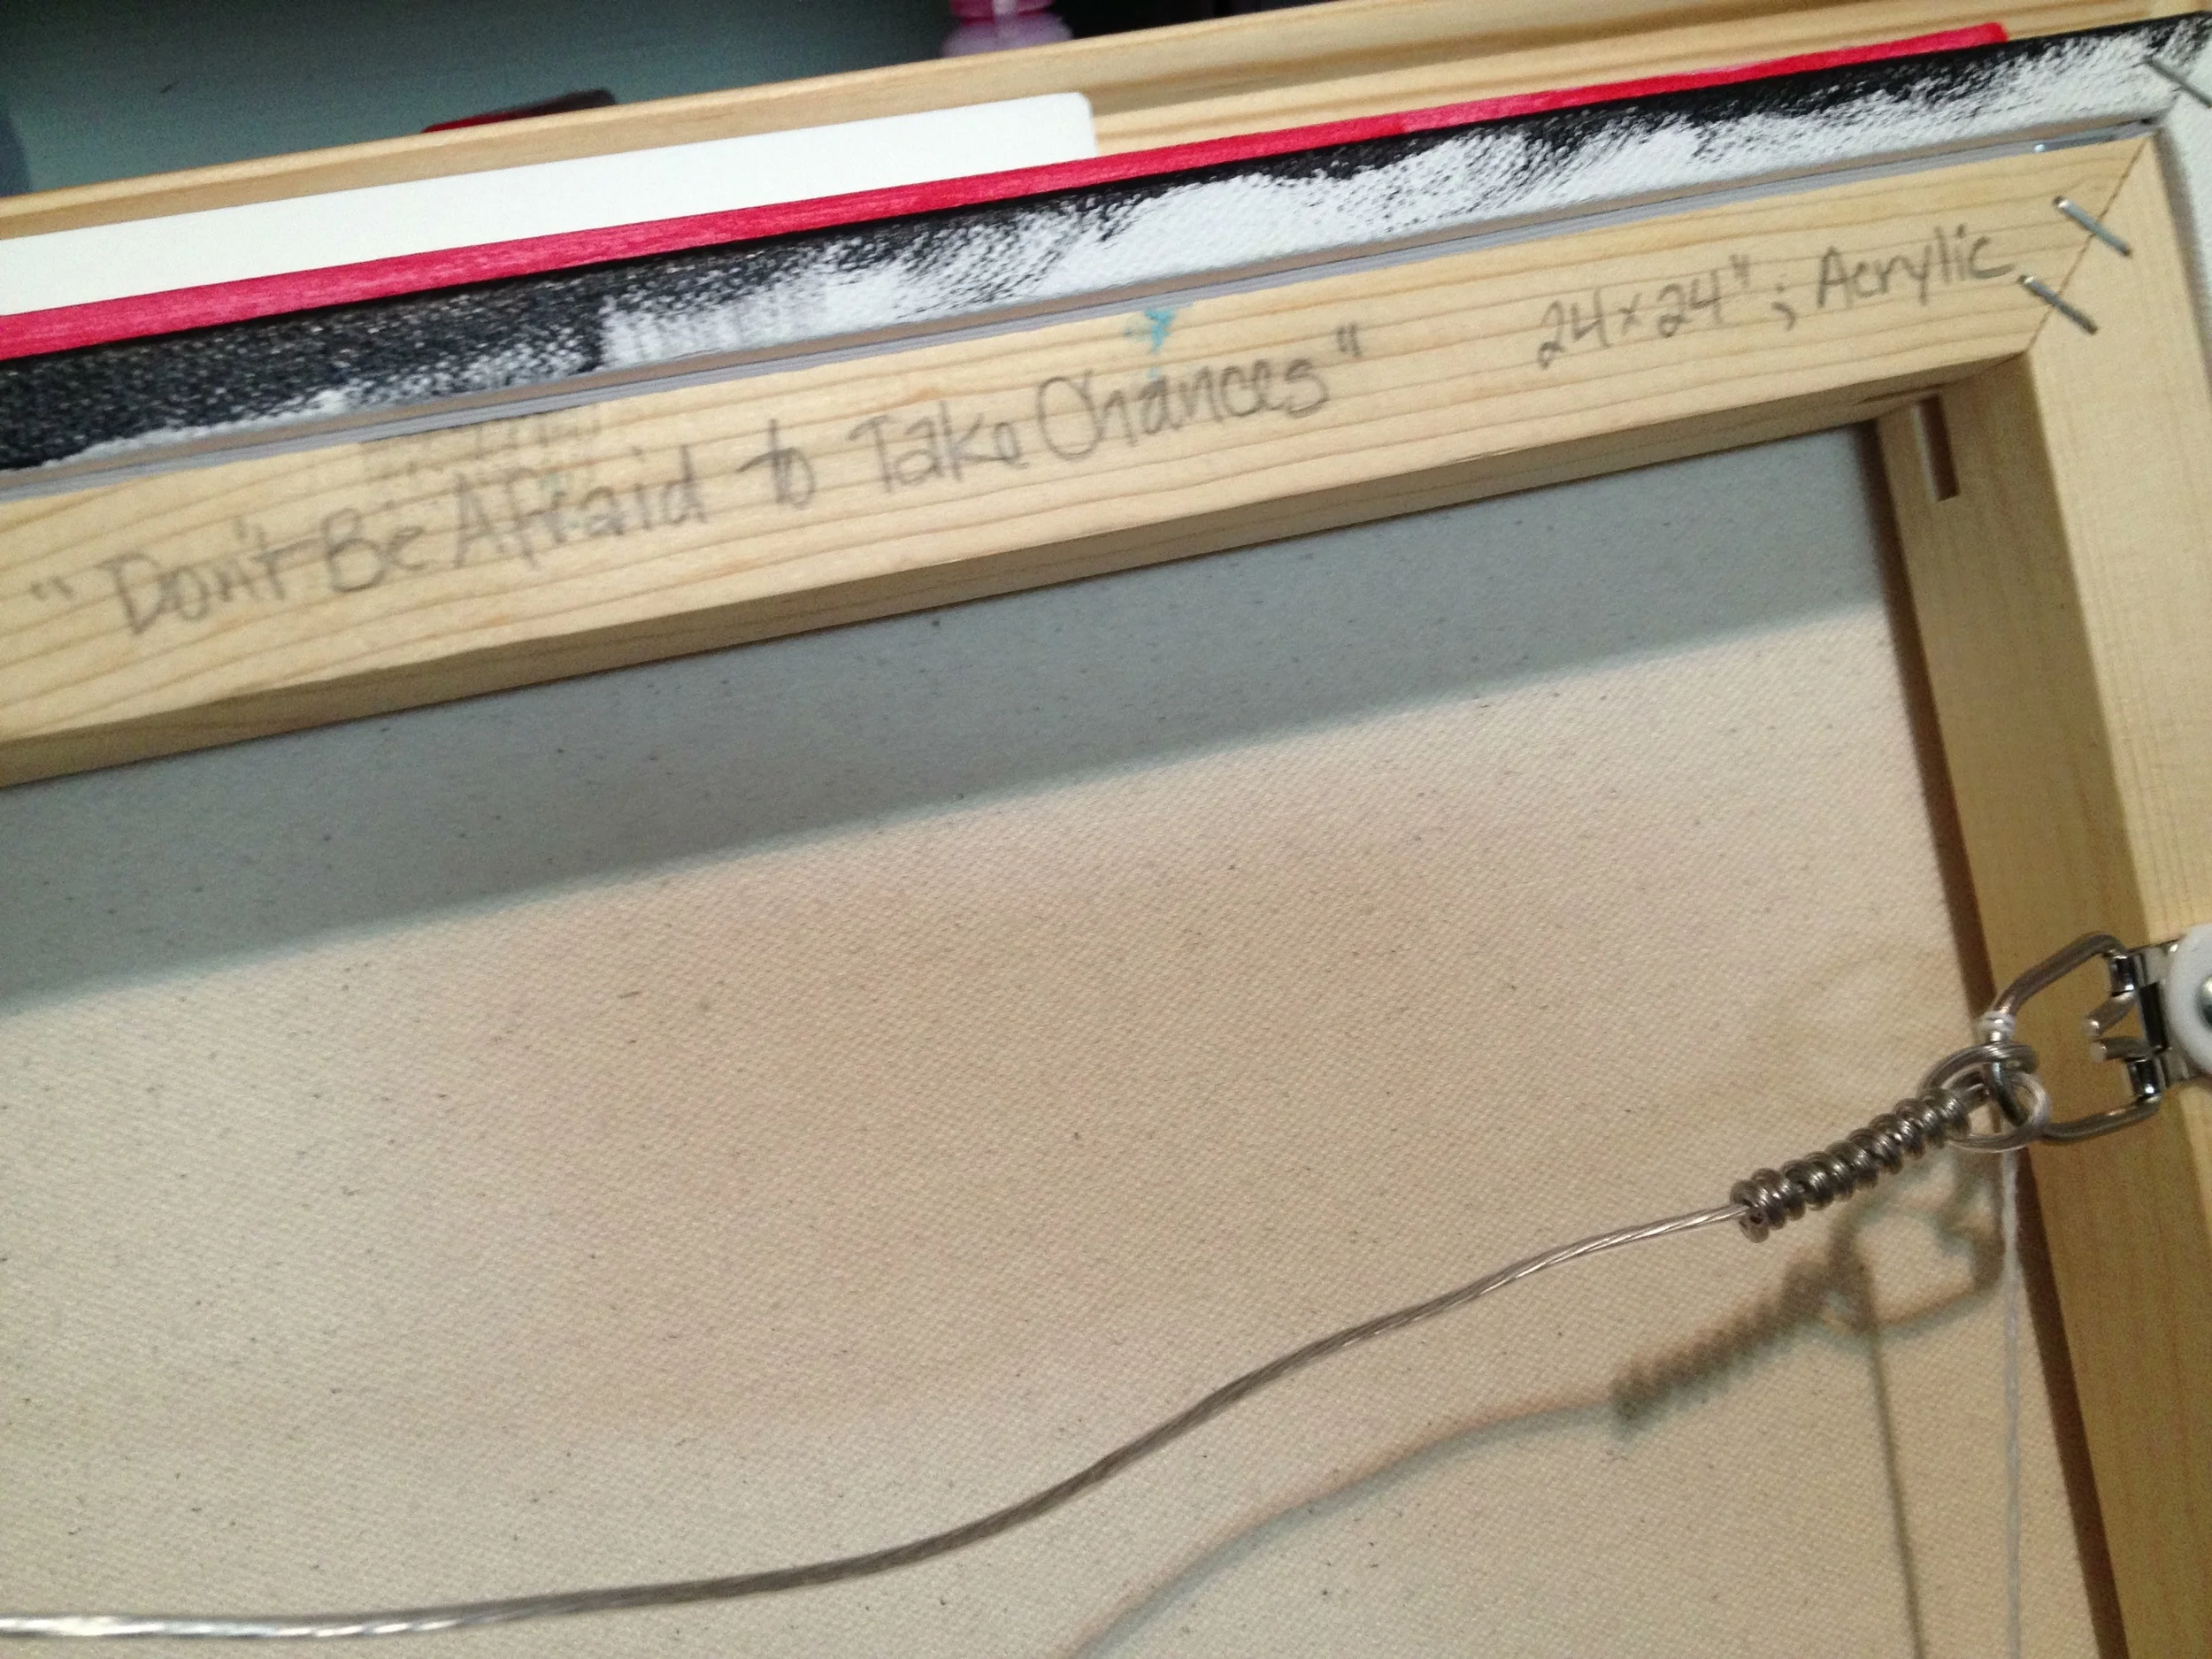
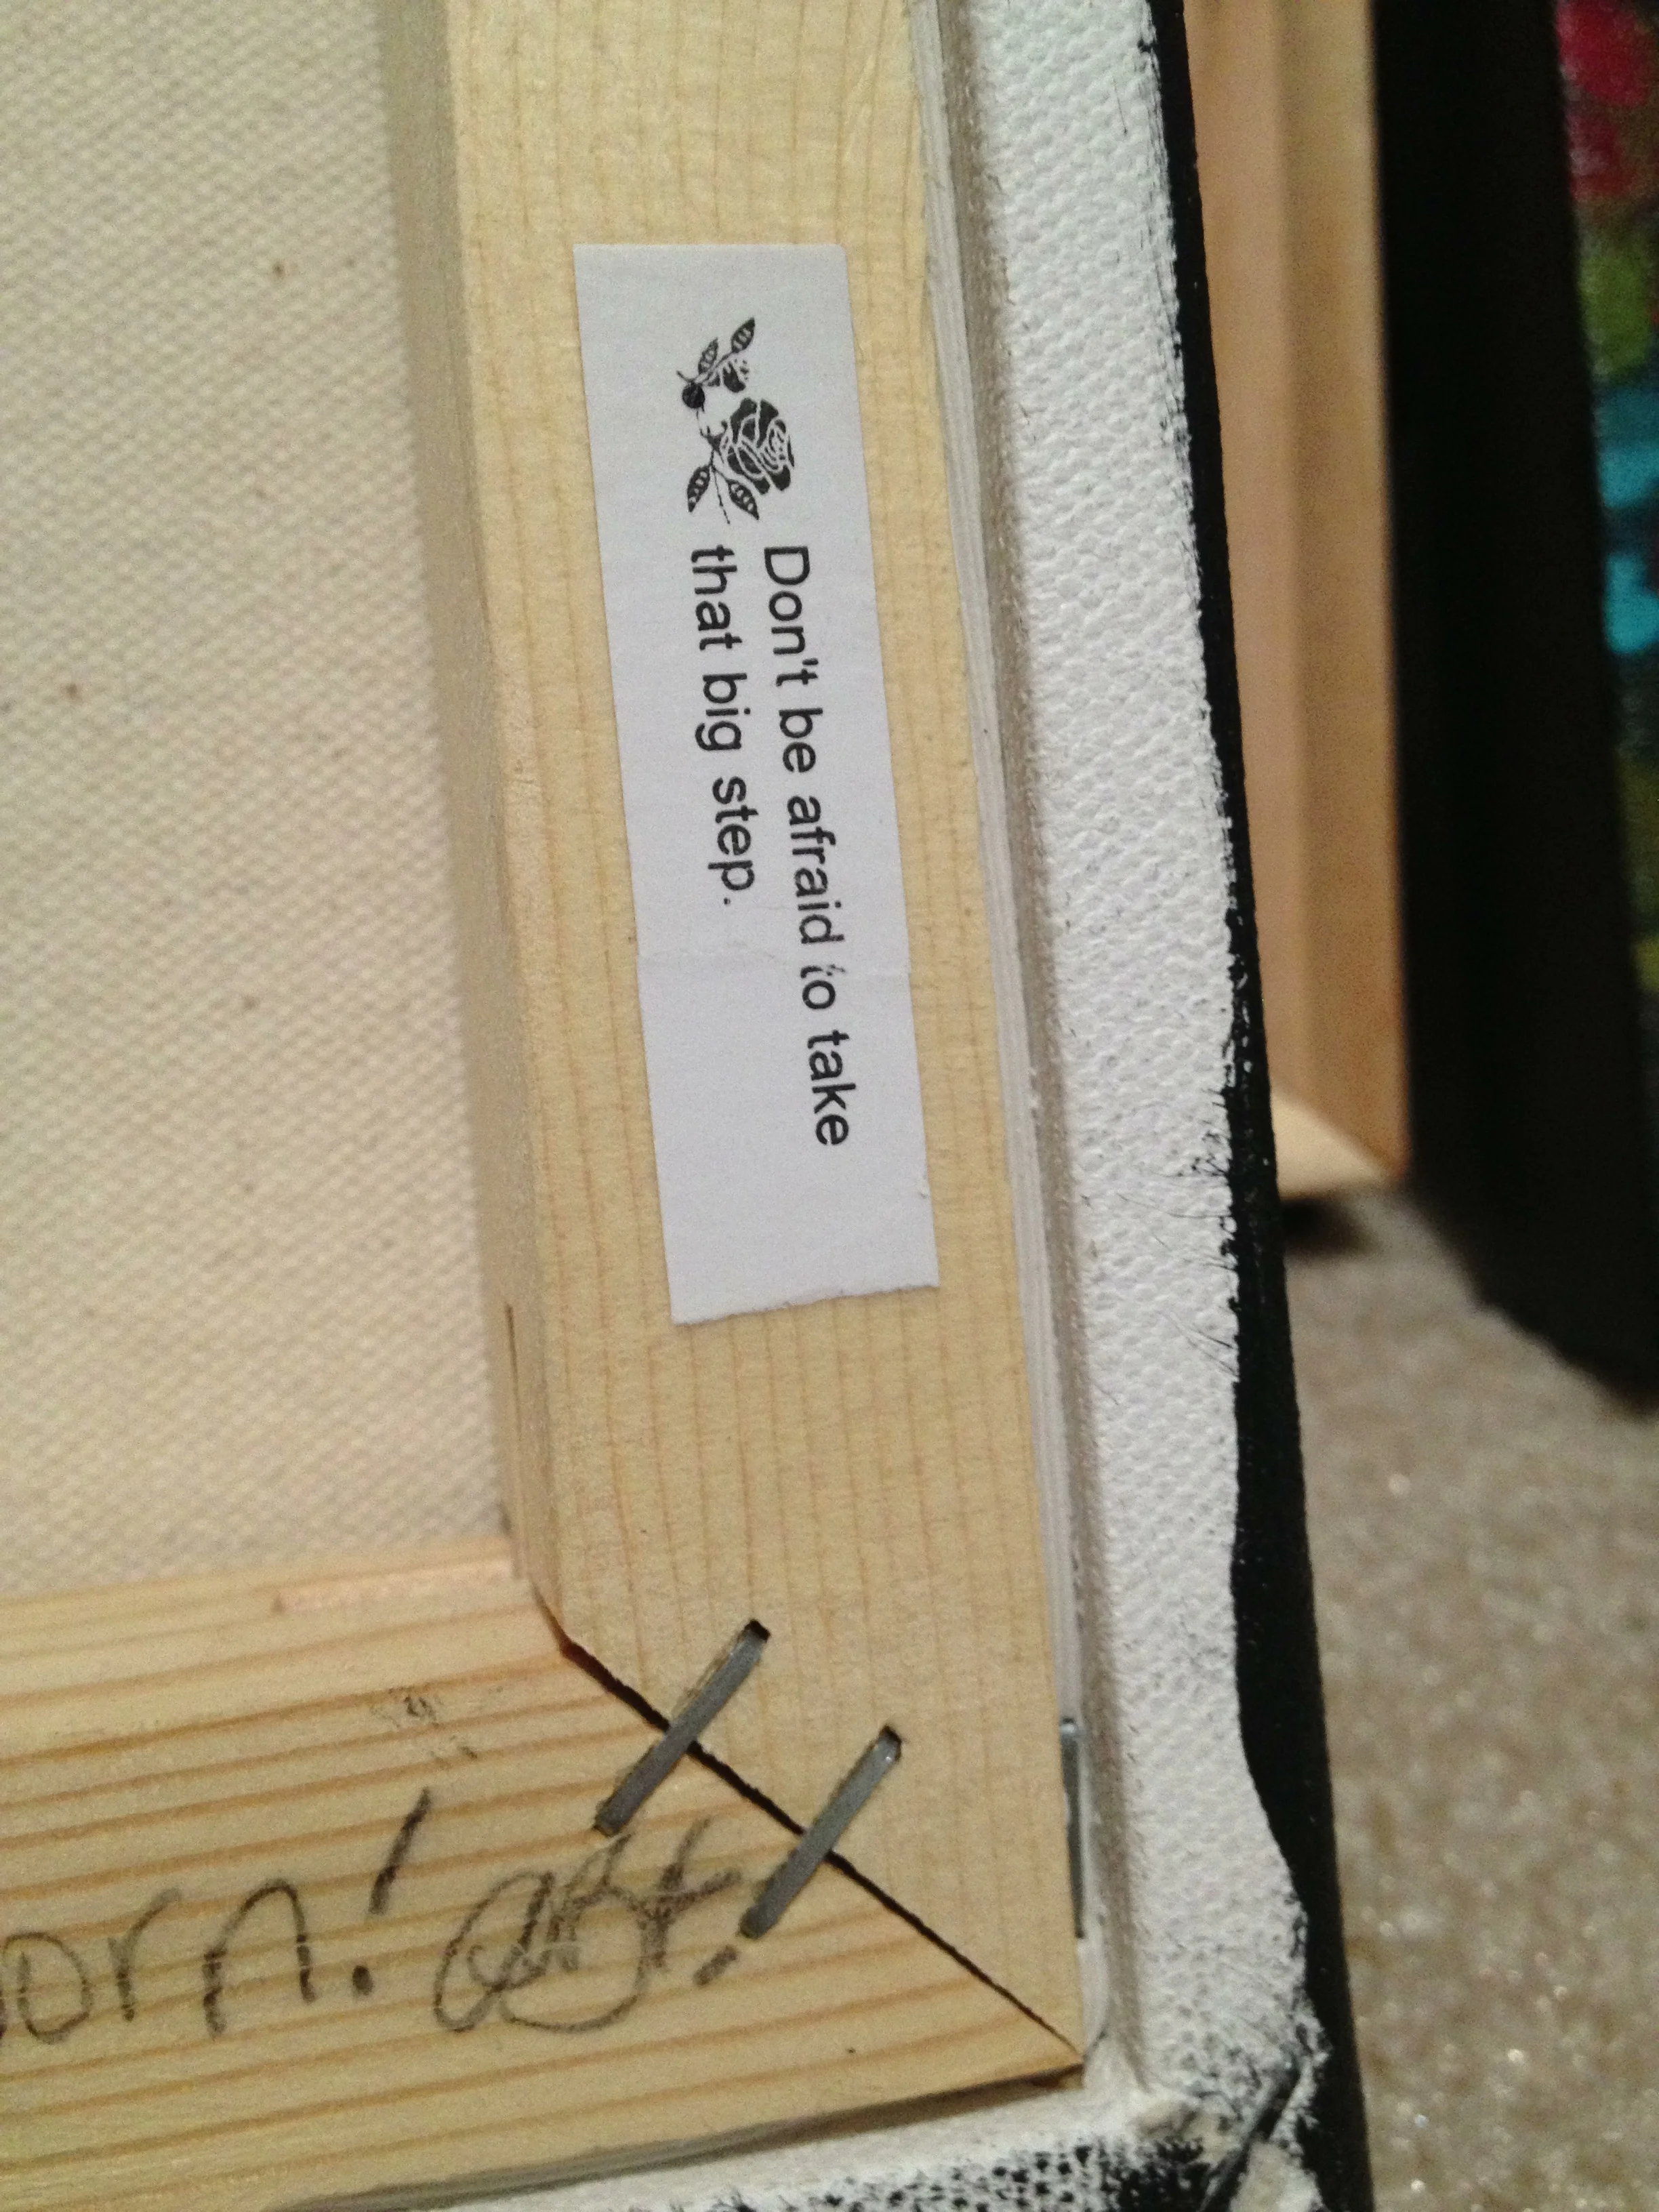
- Glue special keepsakes that mean something to the back. When I painted my piece "Don't Be Afraid To Take Chances" I kept the original fortune and glued it to the back of the piece, to one of the stretcher bars.
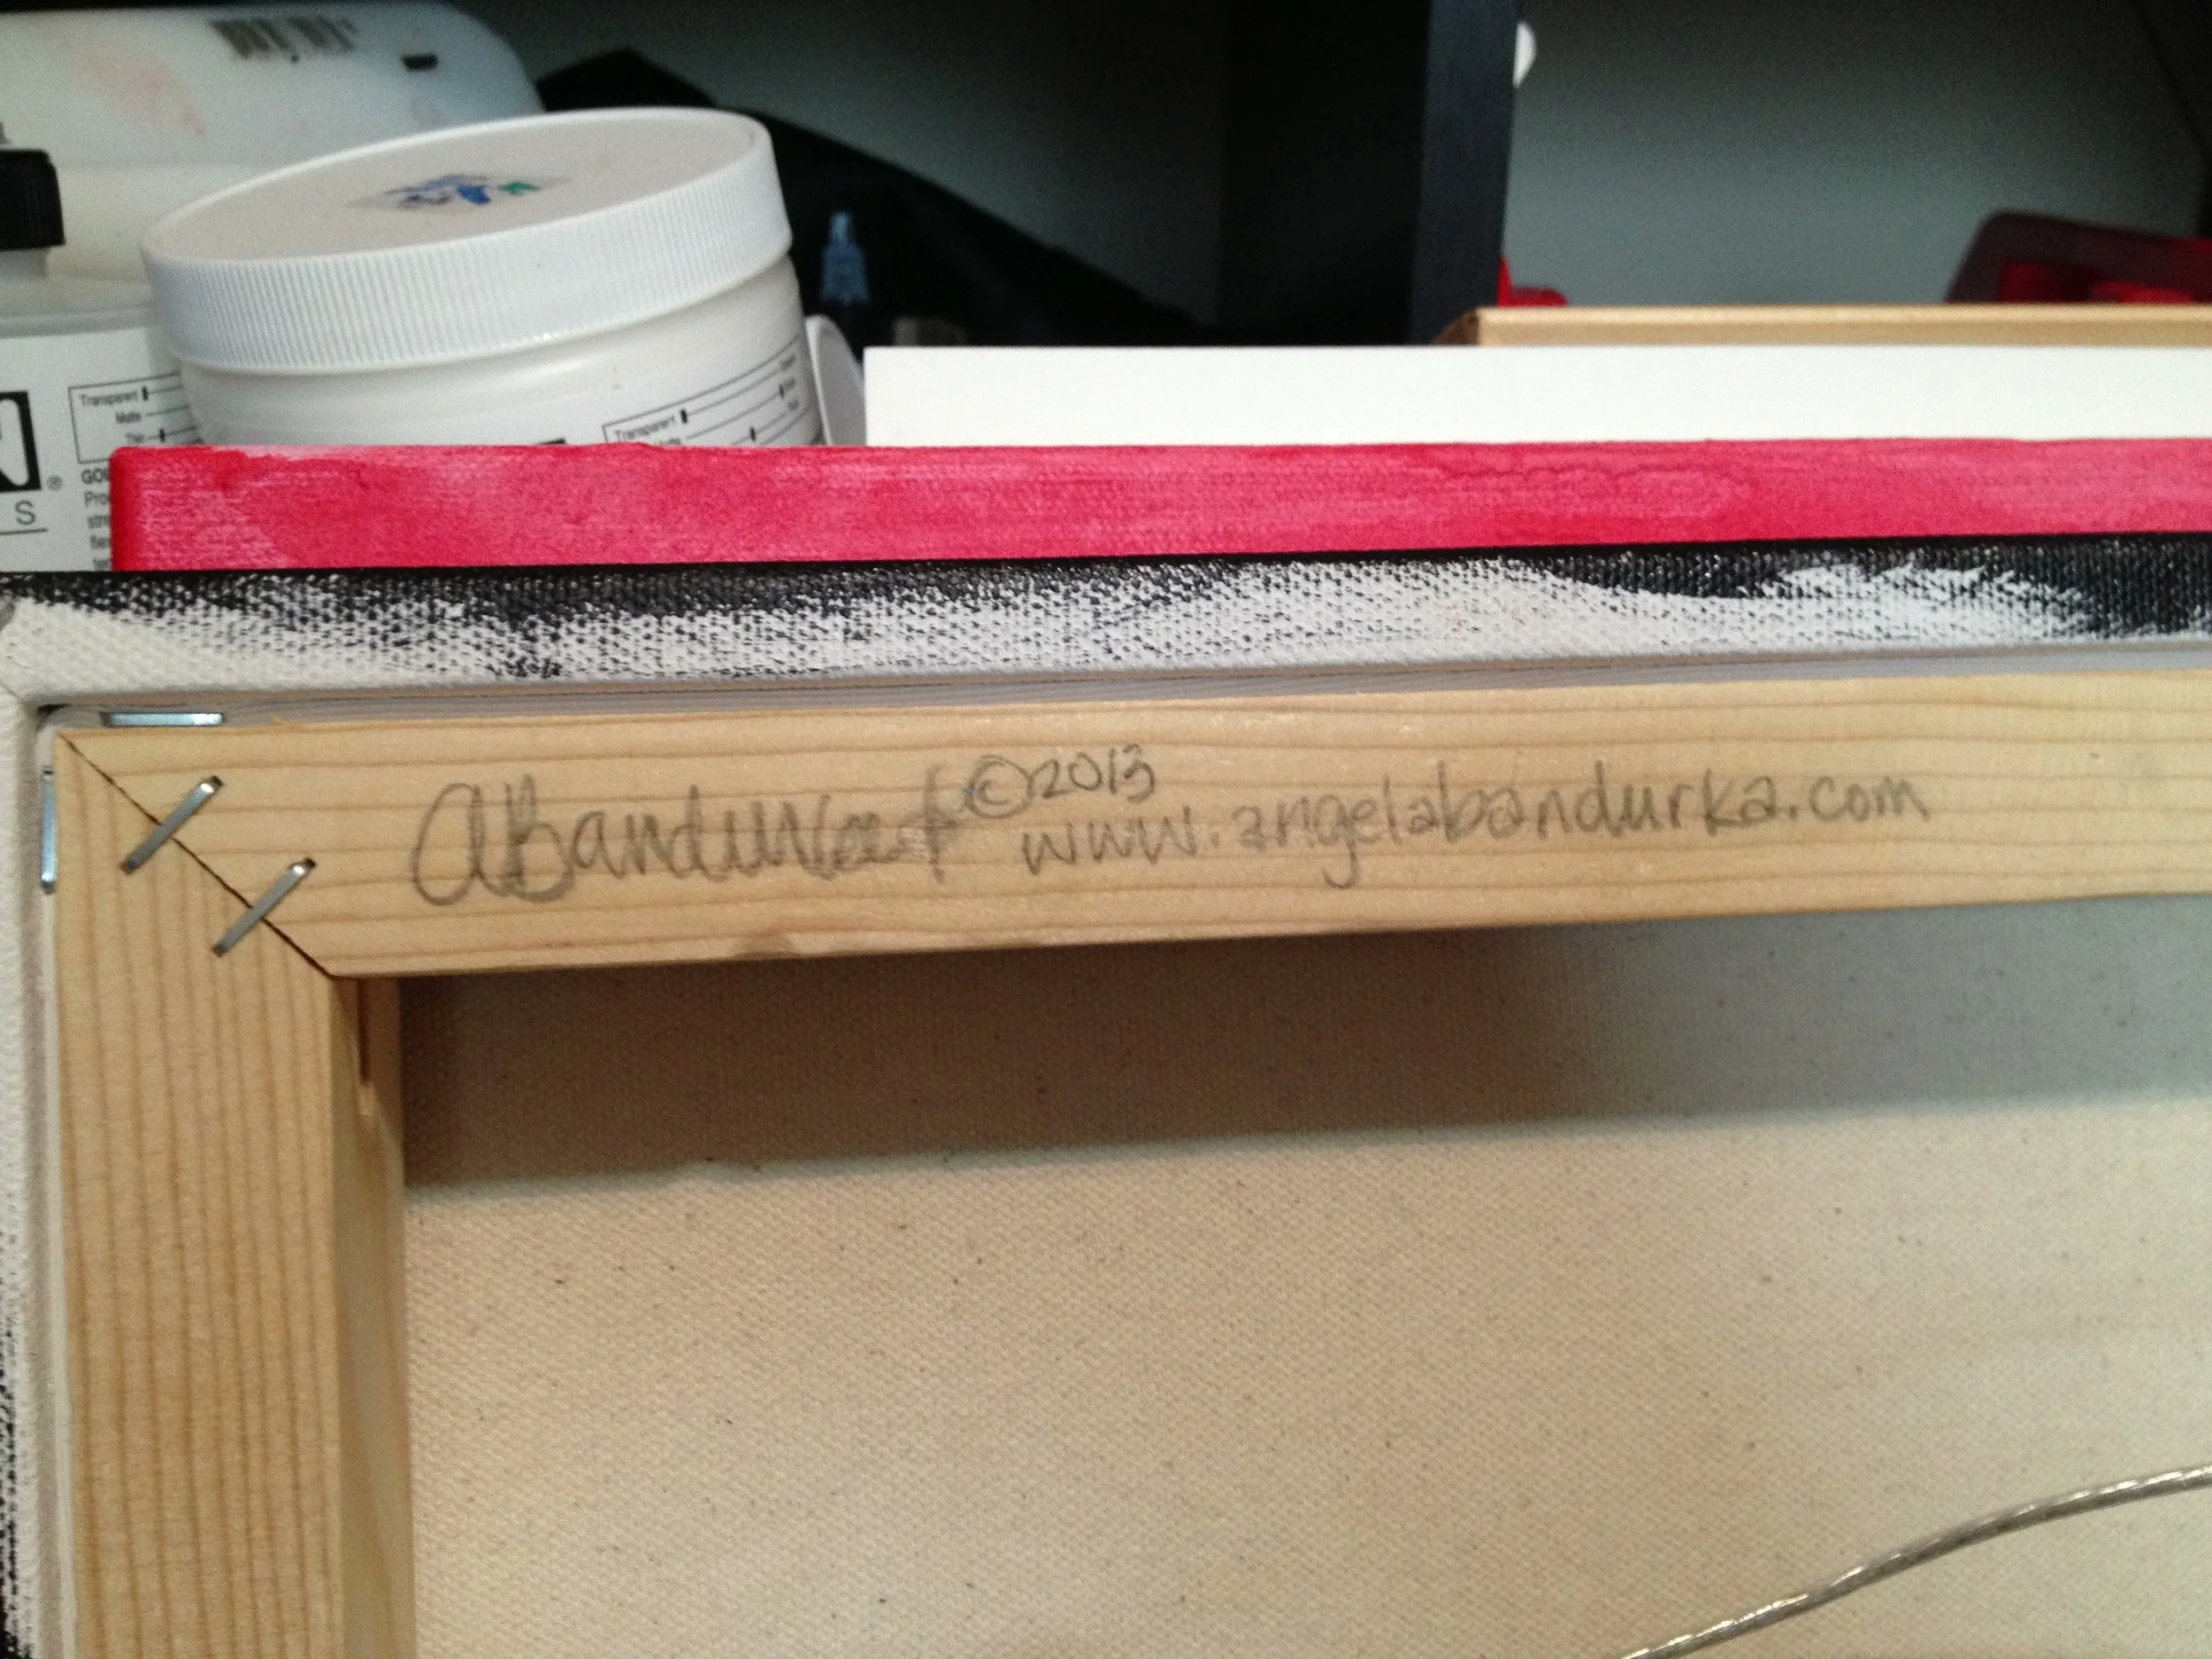
- Write down the Title, Size, Medium, Year the piece was created, then add your URL, that'll allow the paintings owners to see other works by you even years later!
- Paint or Draw something fun on the stretcher bar
- Cover the back with wallpaper or something creative
And of course, the most important thing: String it neatly and professionally for hanging:
- DO use strong D-rings, sized appropriately to carry the weight of your painting
- DO place the D-rings far enough down from the top that the 1-inch or longer hanging hardware on the wall won't show above your work
- DO consider coated wire: it looks nicer and it doesn't cut your thumbs as you put it on the D-rings
- DO use a neat knot to attach the wire to each D-ring, then loop the wire around tightly at least 4-5 times and trim with wire cutters as close to the main wire as you can
- Check out this handy instructional video for attaching D-rings and wire: https://www.youtube.com/watch?v=mdU0B8ov2Z0
Neon: Not Just an 80s Throwback
While giving a private lesson to an amazingly multi-talented couple who have taken private lessons with, I discovered a neat little trick that helped me solve a problem I've encountered in the past.
See, I have a confession to make: painting velvety objects that are bright crimson/magenta freak me out. Not because I don't like their colour and texture - I do - but because it's incredibly hard to reproduce. I find it difficult to get the right values at the right intensity. Buying crimson and magenta is the first step, you have to have the right base colour out of the tube. But how can you lighten its value without significantly decreasing its saturation? Adding white makes it more chalky and less vibrant, putting in some yellow just doesn't do it either. And what if all the tubes you bought are transparent?
To attempt to keep the colour vibrant, I added neon pink to the mix; using it to lighten my magenta allowed me to maintain its vibrancy - especially since it was a very transparent magenta that I was using.
Below is the shot of the original flower, and the completed demo. There are no wasted opportunities, people! Get out there and play with your paint!
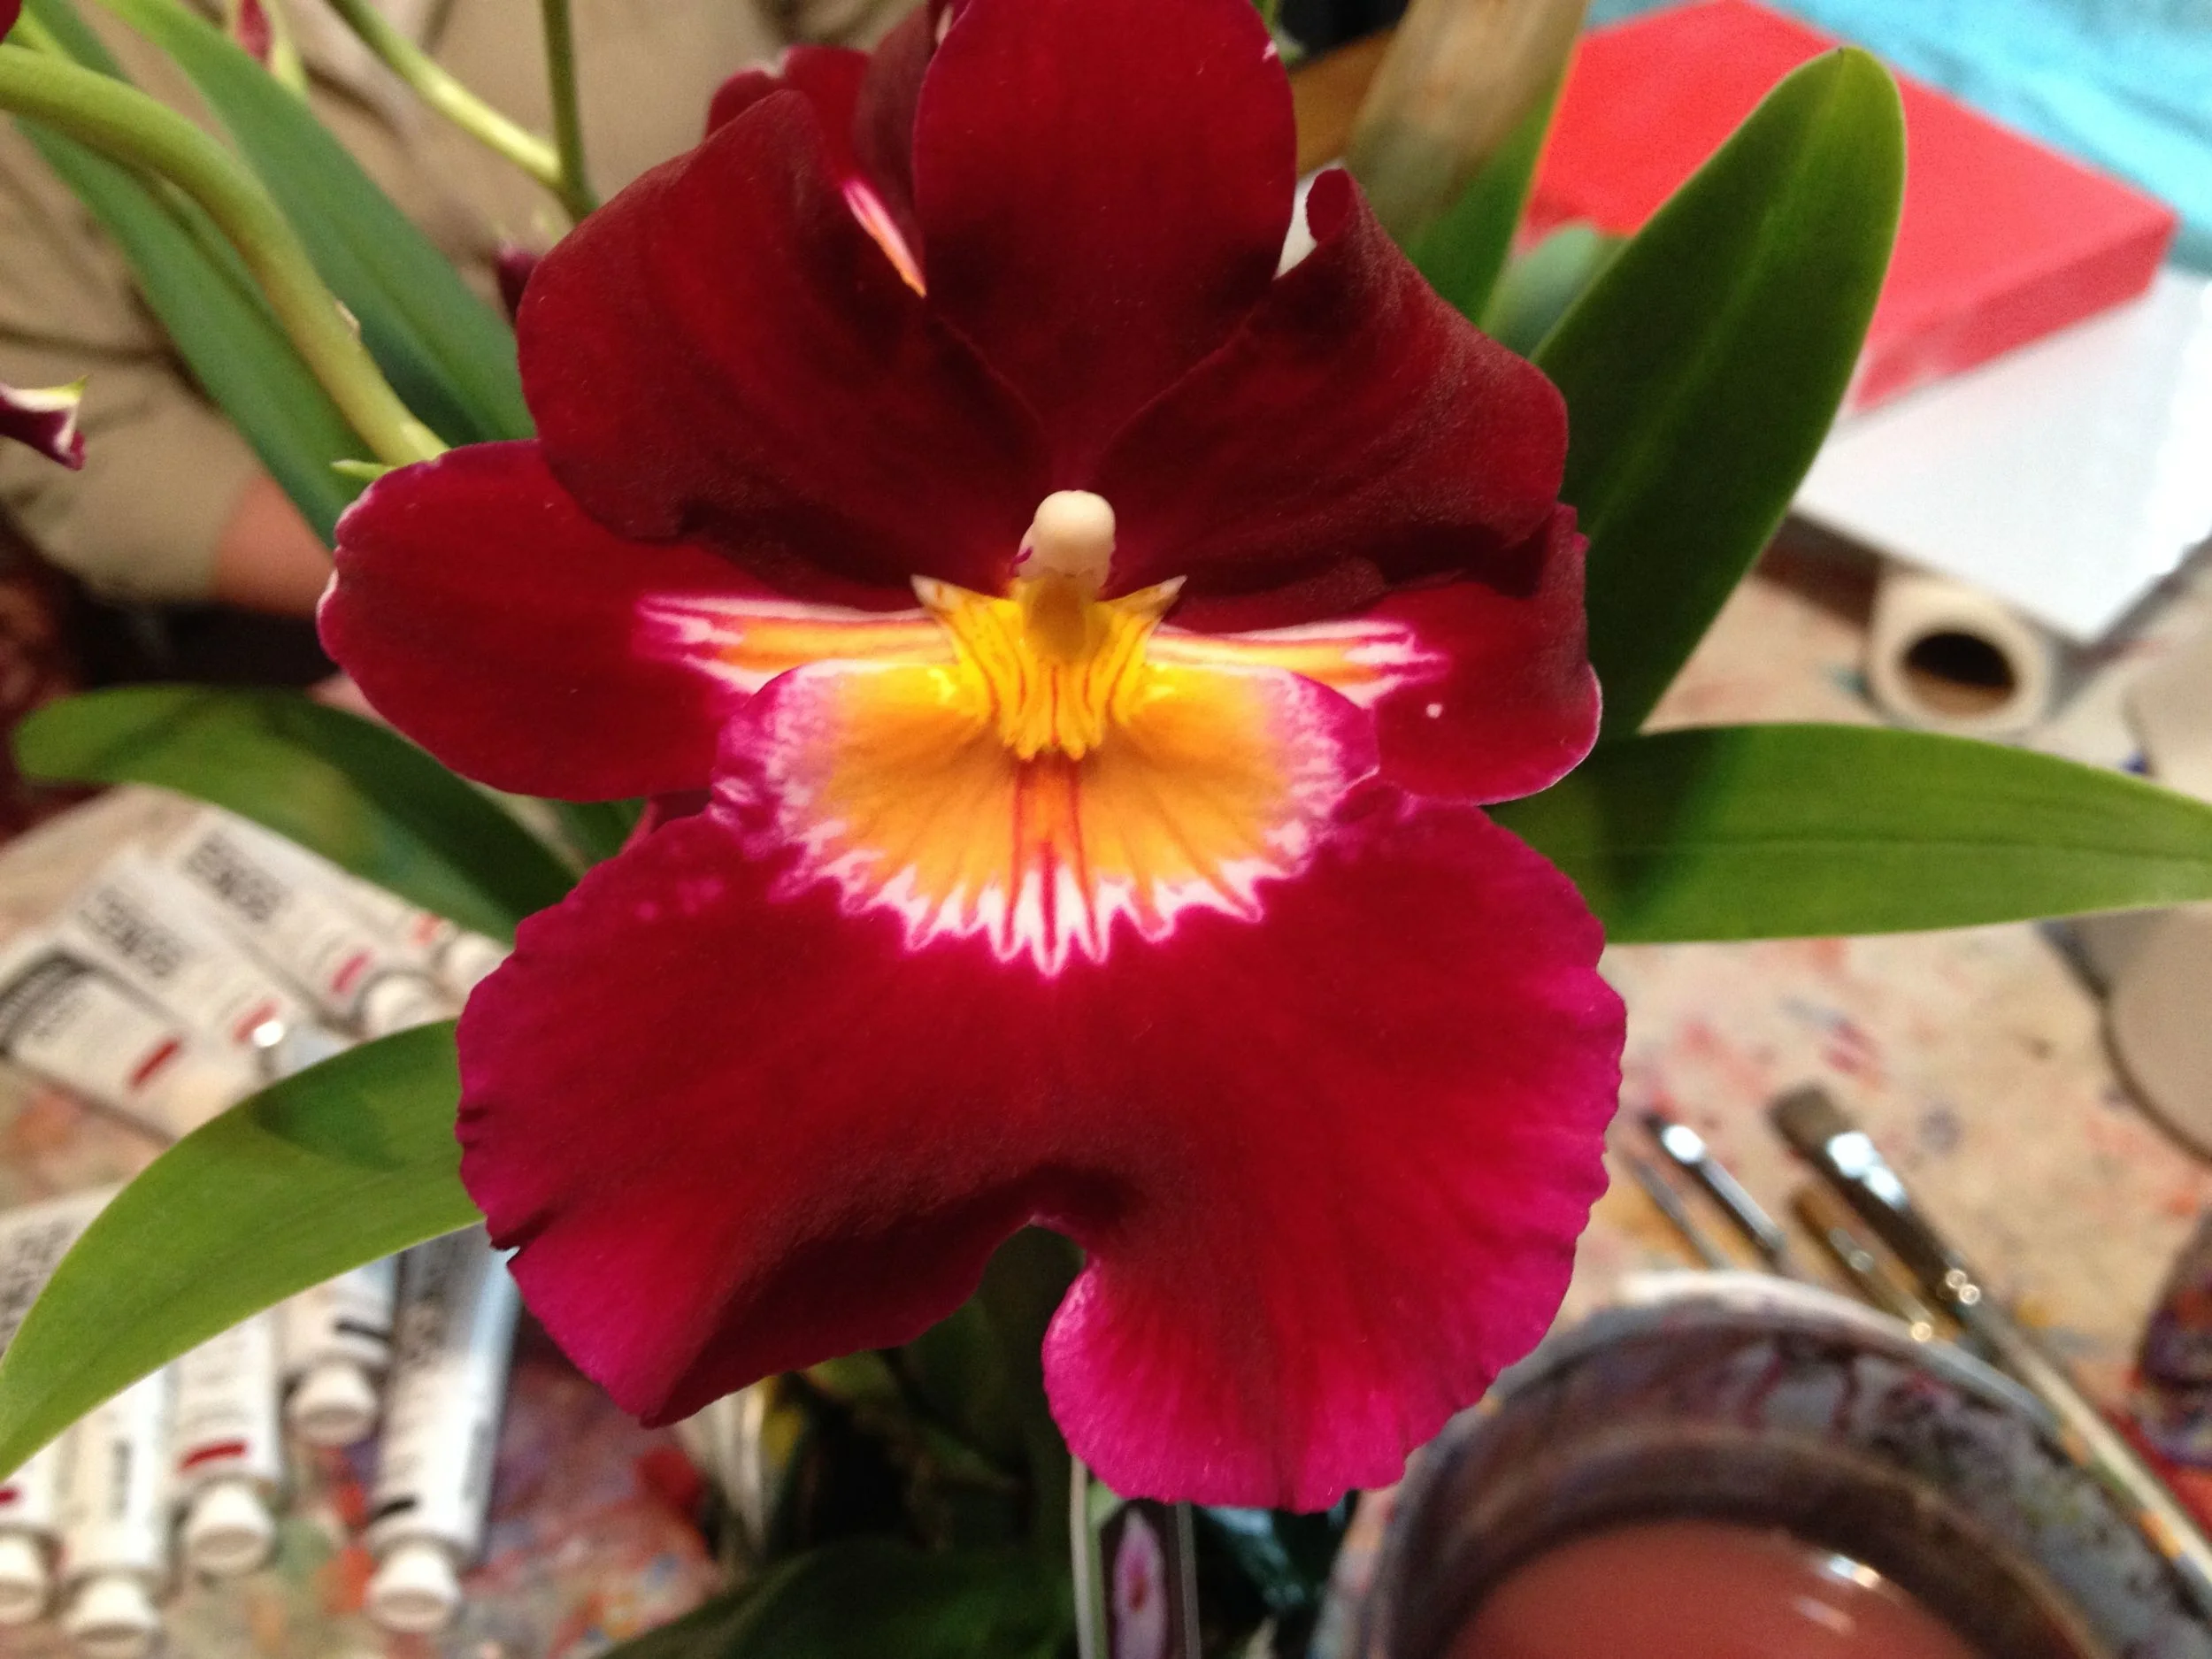
A gorgeous orchid! Look at that rich colour!
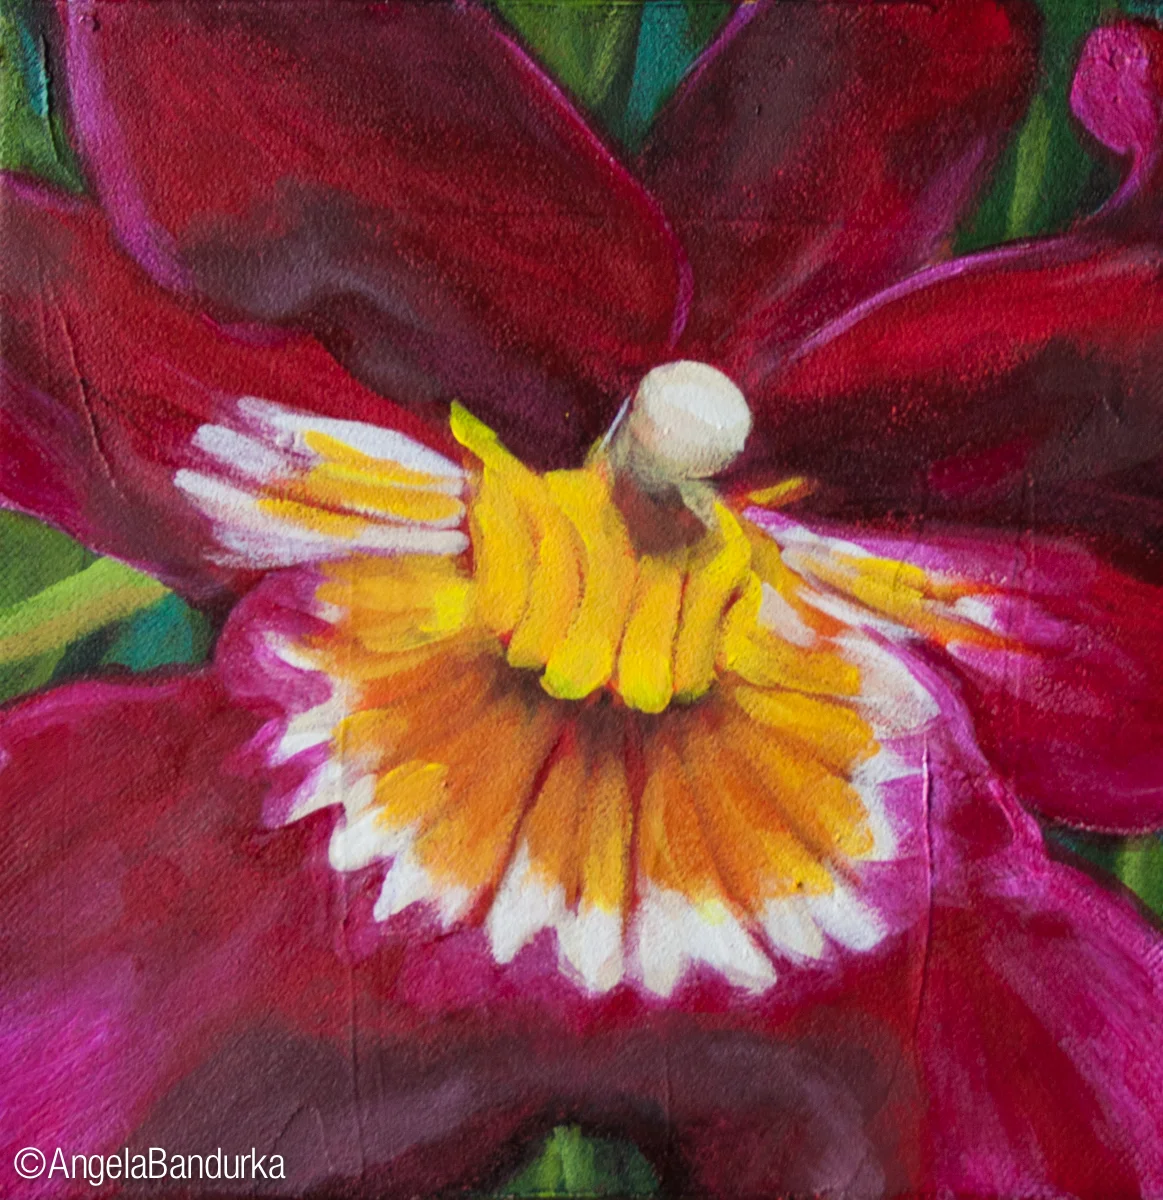
And here is what I produced: the highlights all have neon pink added to the colour, which helped me keep the value light but very saturated and vibrant :)
Acrylic Mediums are the BOMB, baby!
After a very informative presentation about Acrylic Mediums, I thought I'd pass on the info to you all - find out what kind of medium makes a painting look like an encaustic. Or how you can "glue" elements together for a creative collage, and more!
Read MoreHow to Paint On Location
When the weather starts to improve, I start to get the 'plein air' itch. (Plein Air, btw, is just a fancy schmancy way of saying that you paint outside). There's nothing like getting out into nature and painting! Before I started doing this, I was very nervous about starting: what would people think if they saw me out there? and what kinds of supplies would I need?
I'm going to try to answer that for you, in this blog post!
Read MoreOld, Trusty, & Faithful: Cutting down a painting and refitting it to a new size
Do you ever finish up a painting and wish you'd used a different sized canvas? This just happened to me, so I'm posting the steps I took to fix this problem!
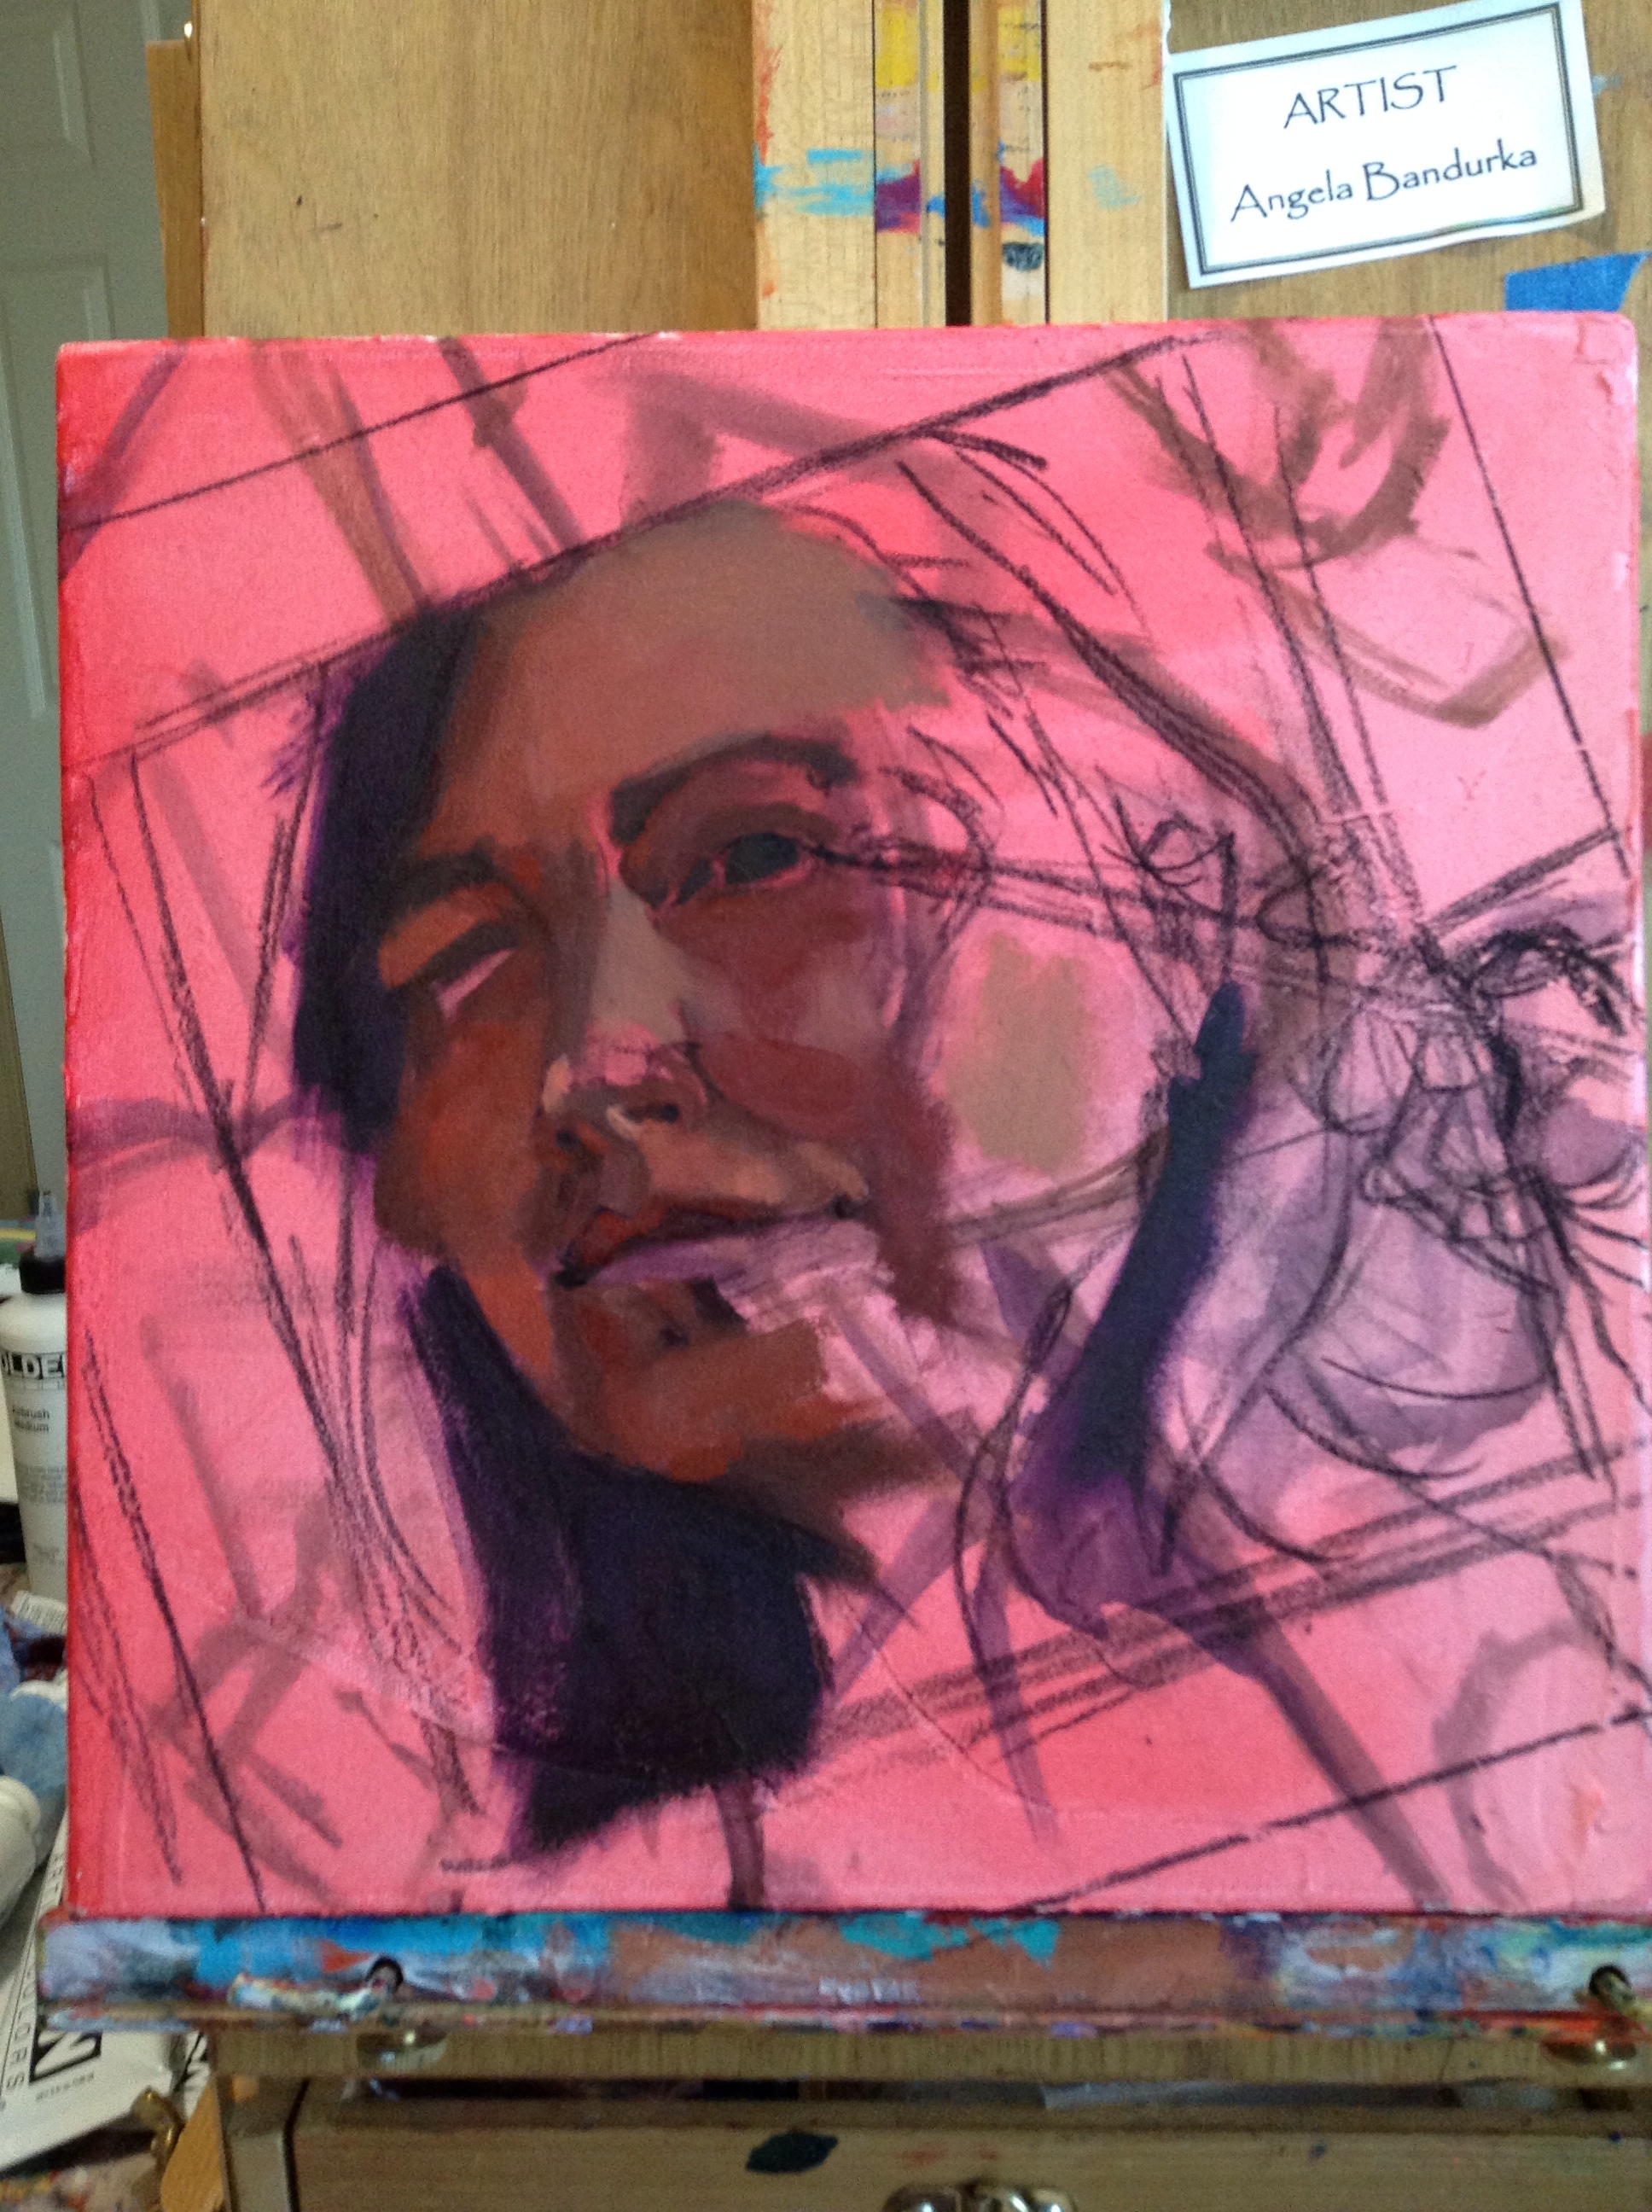
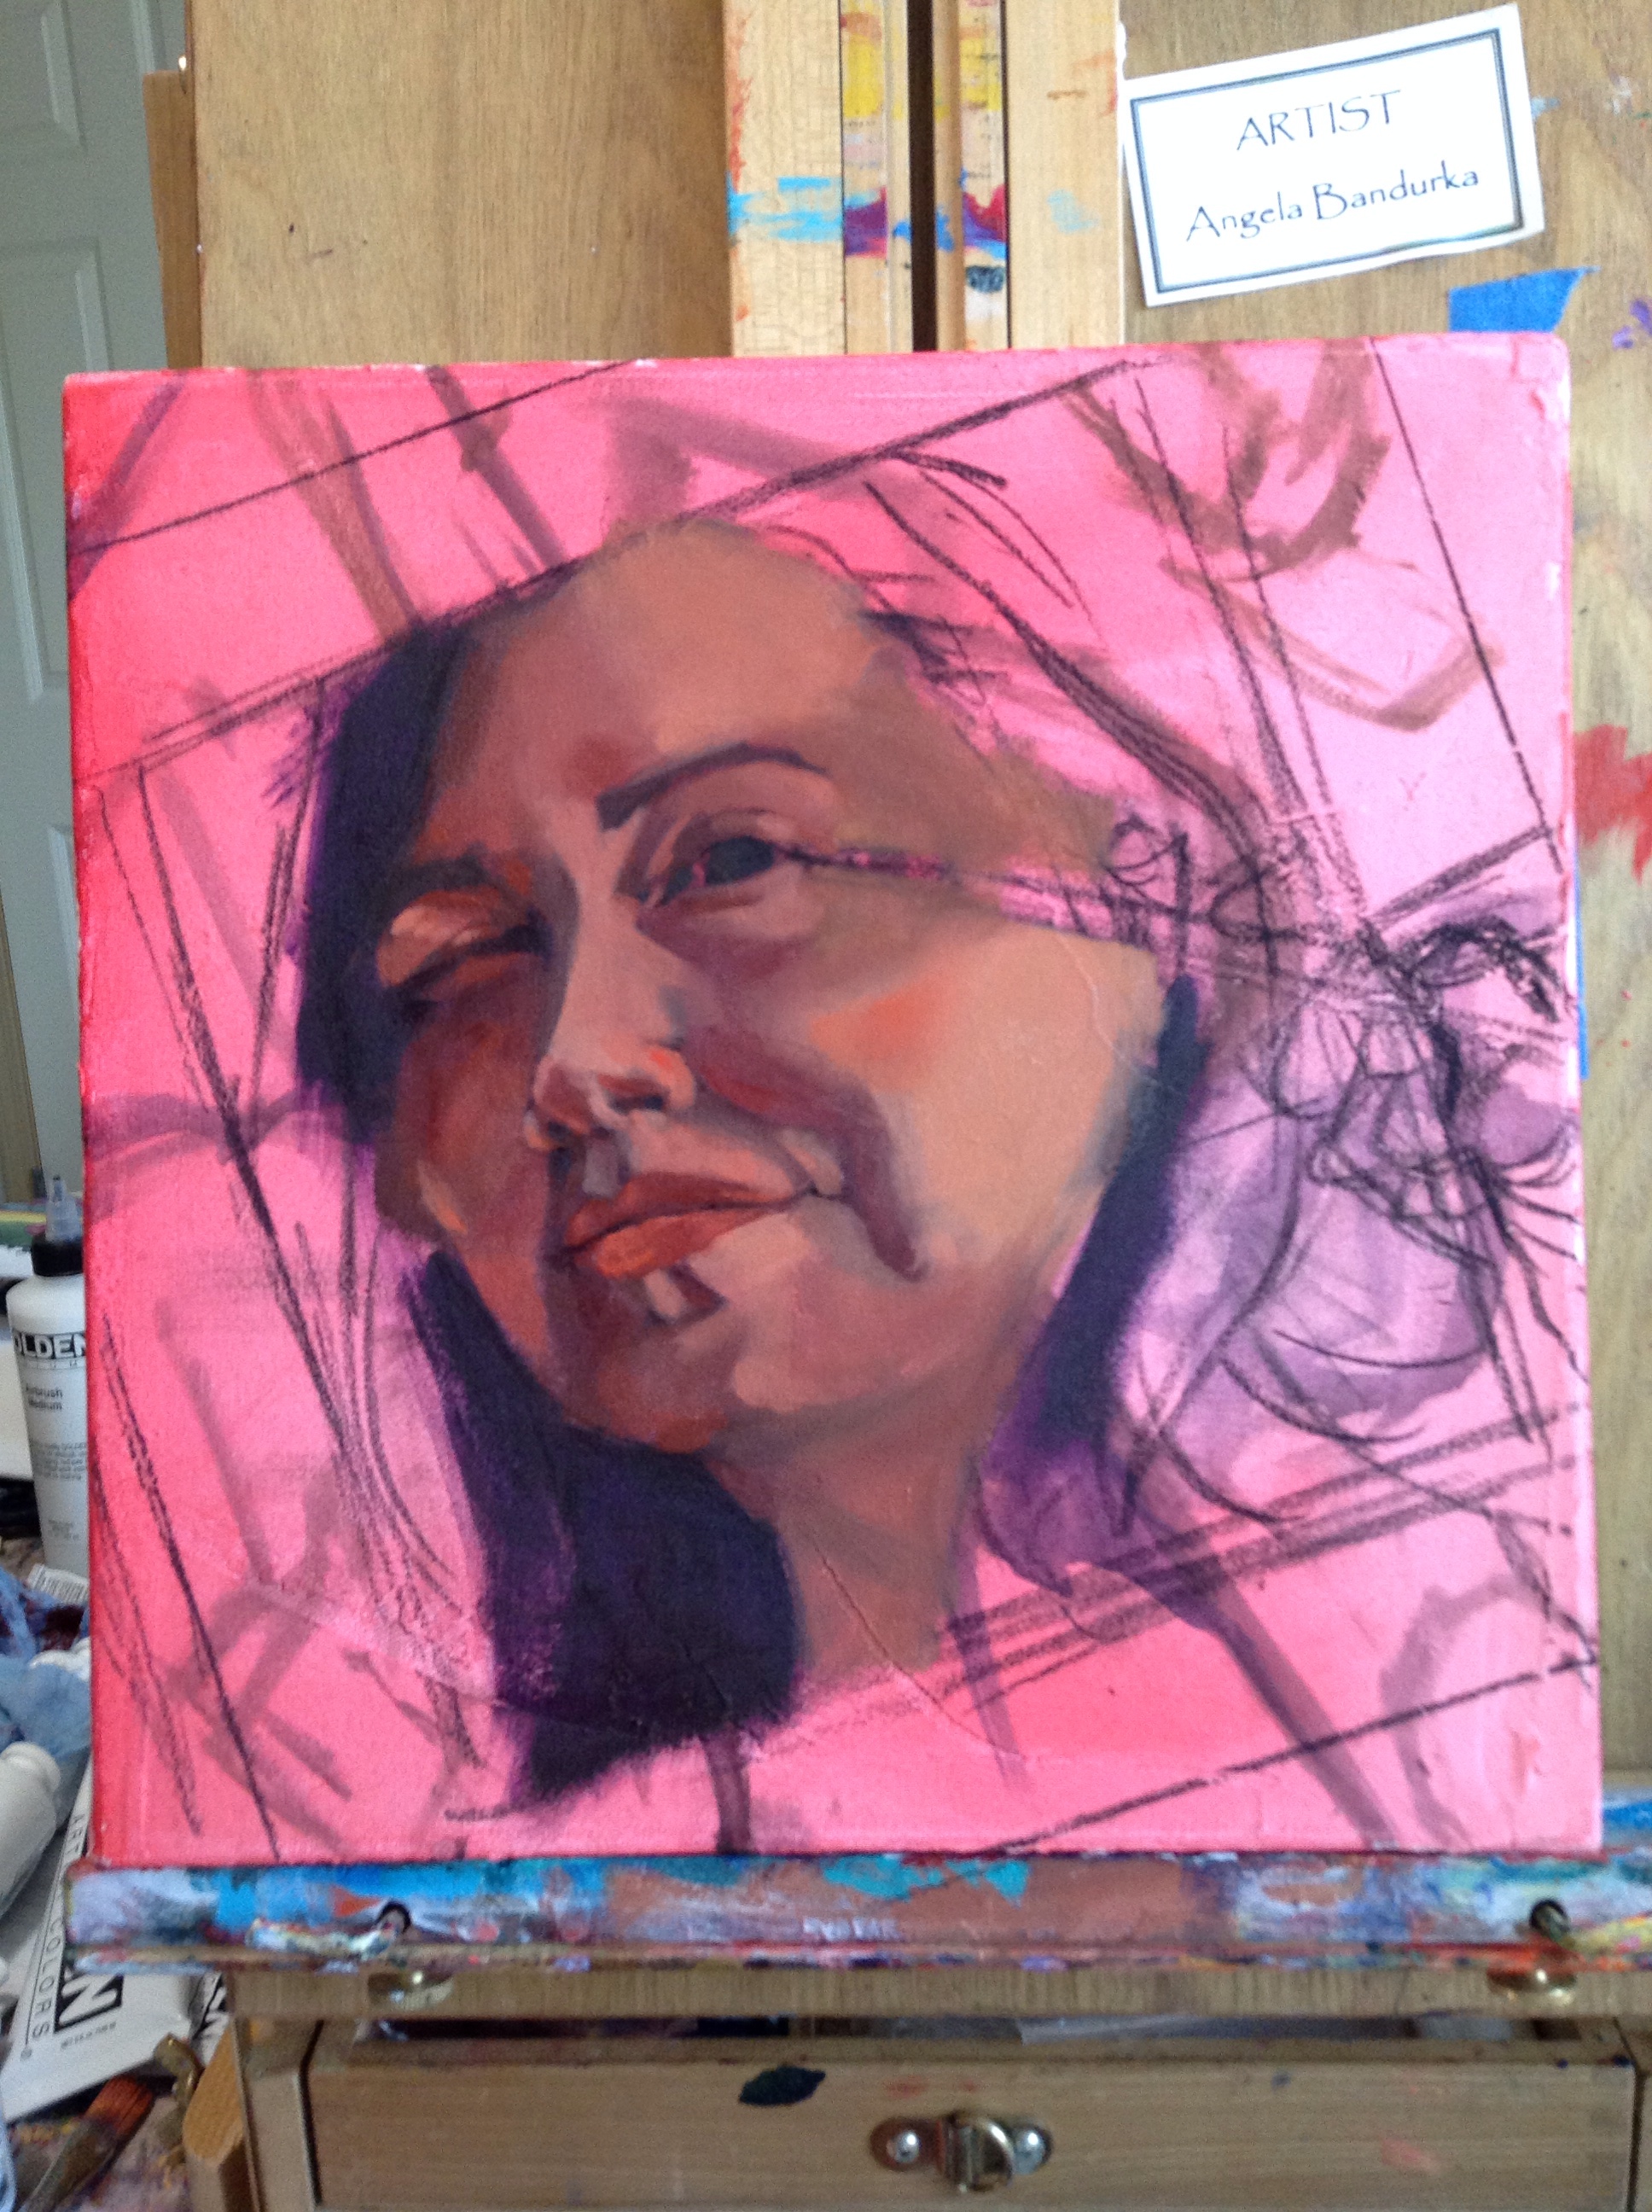
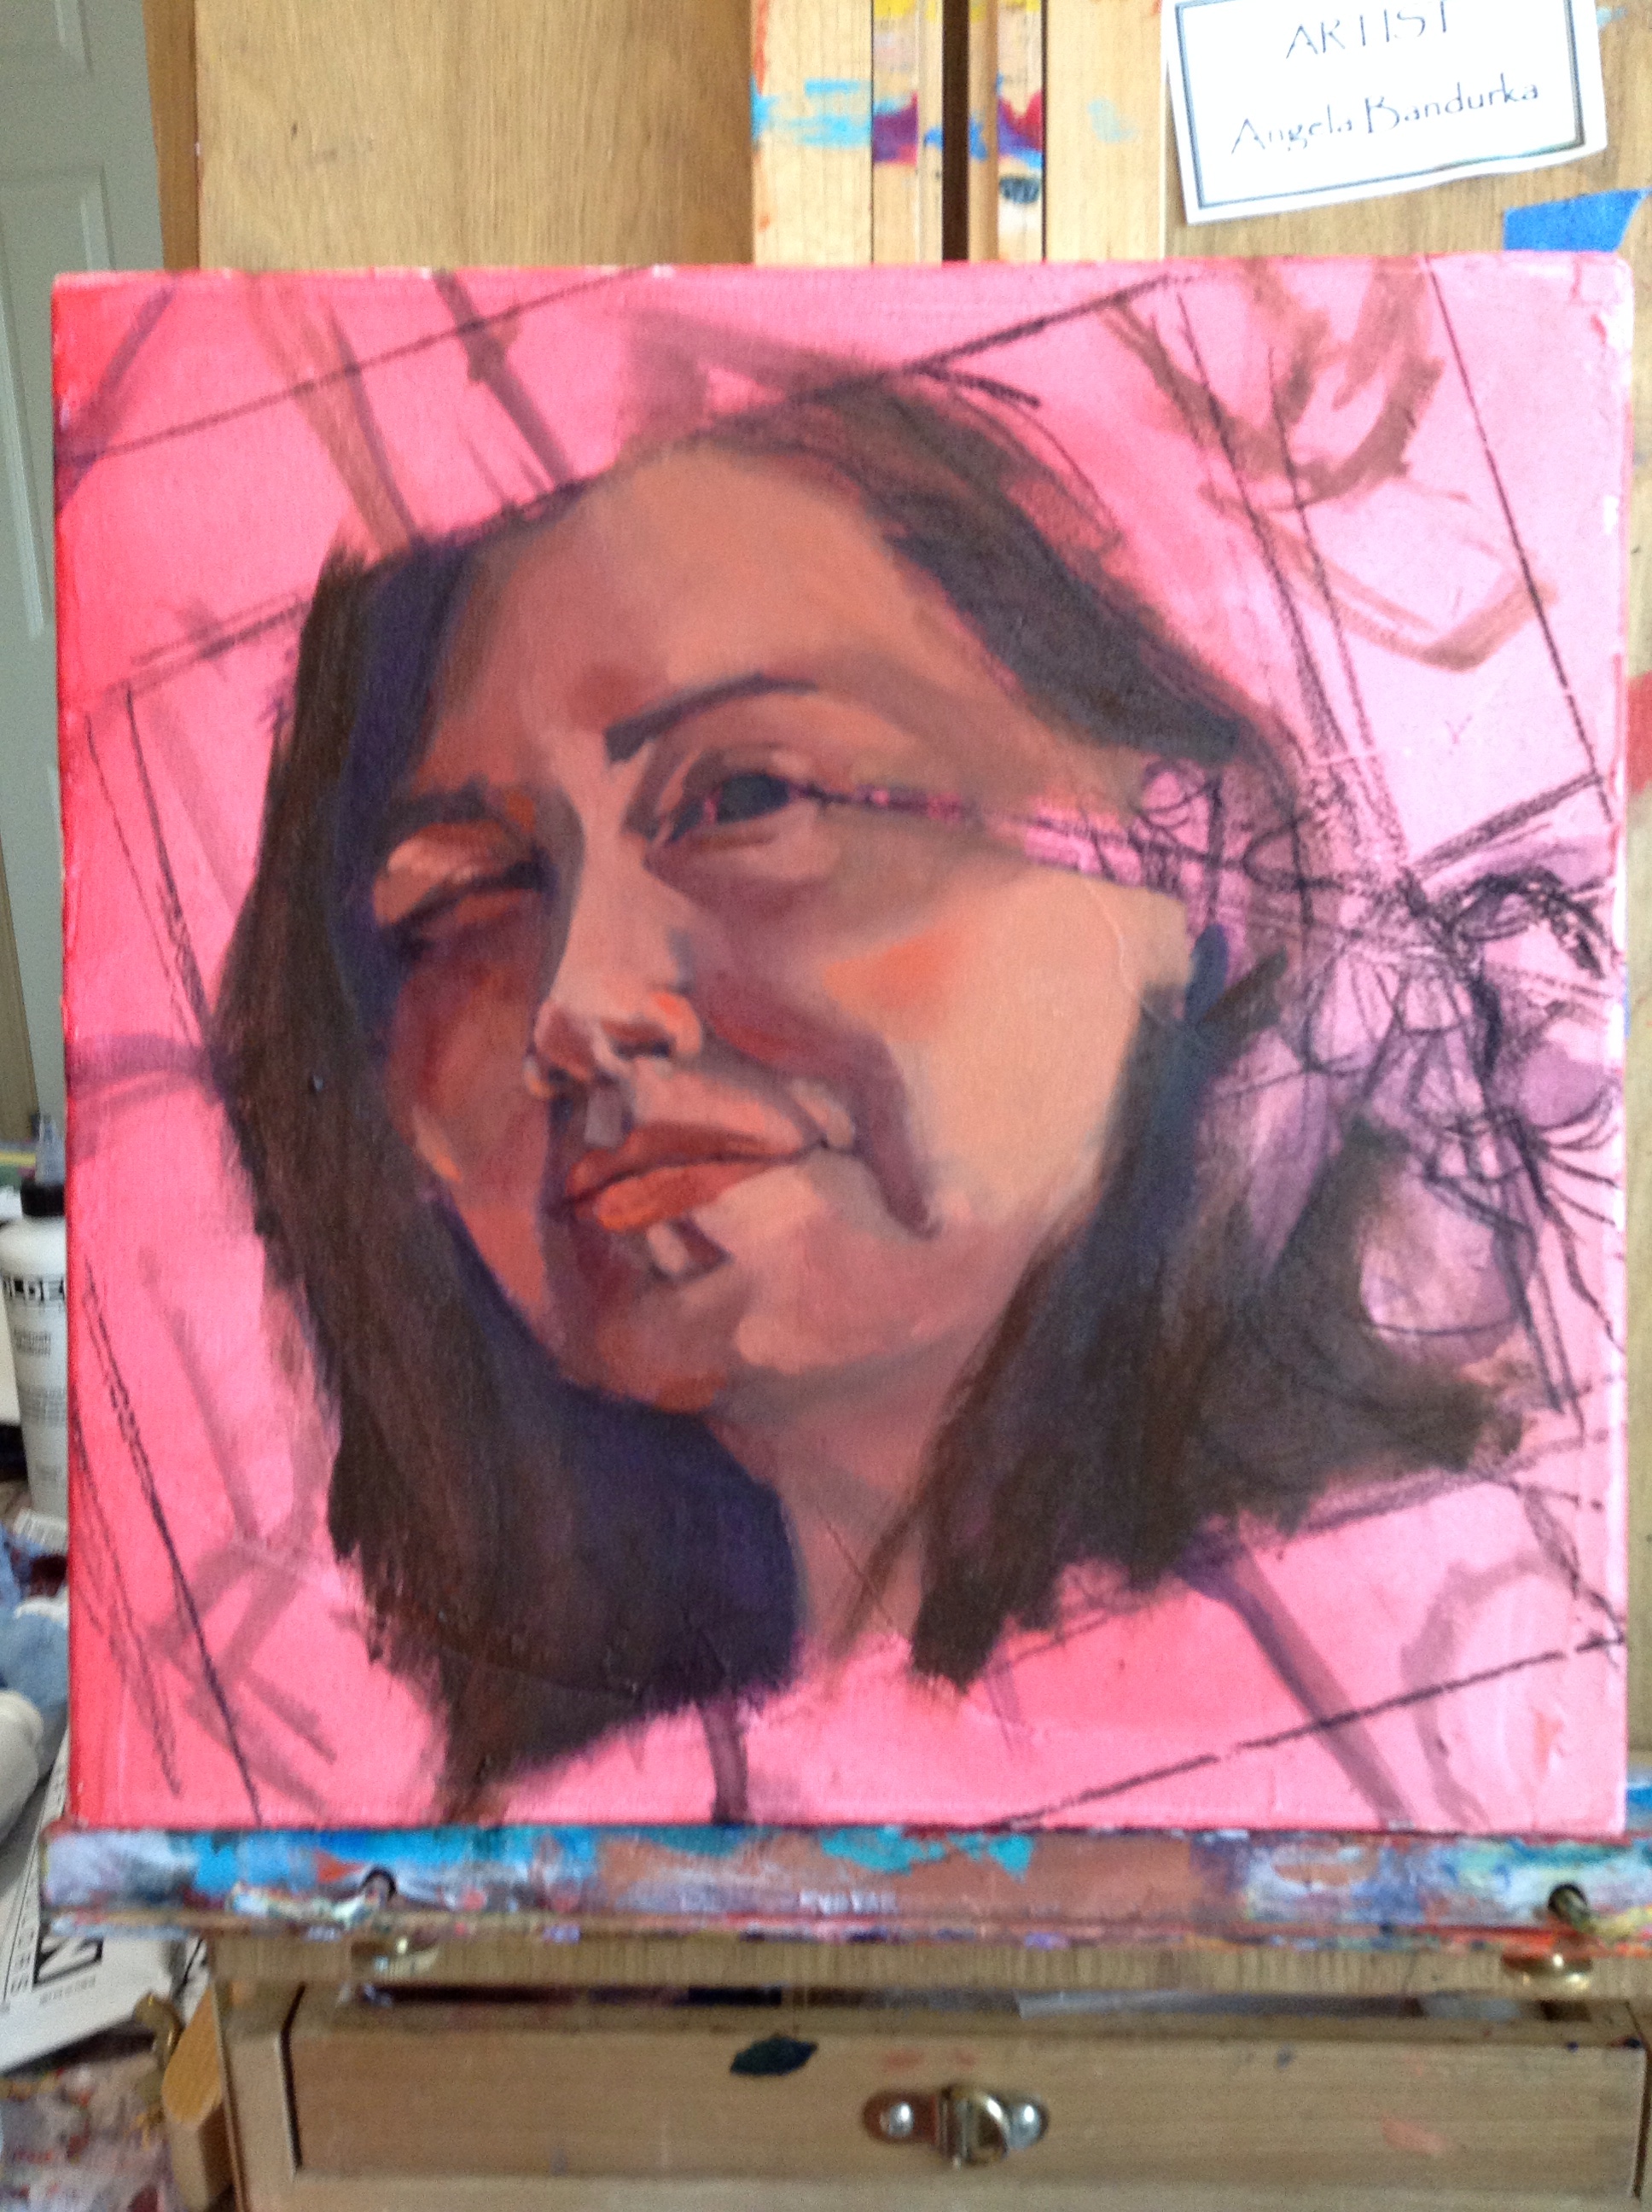
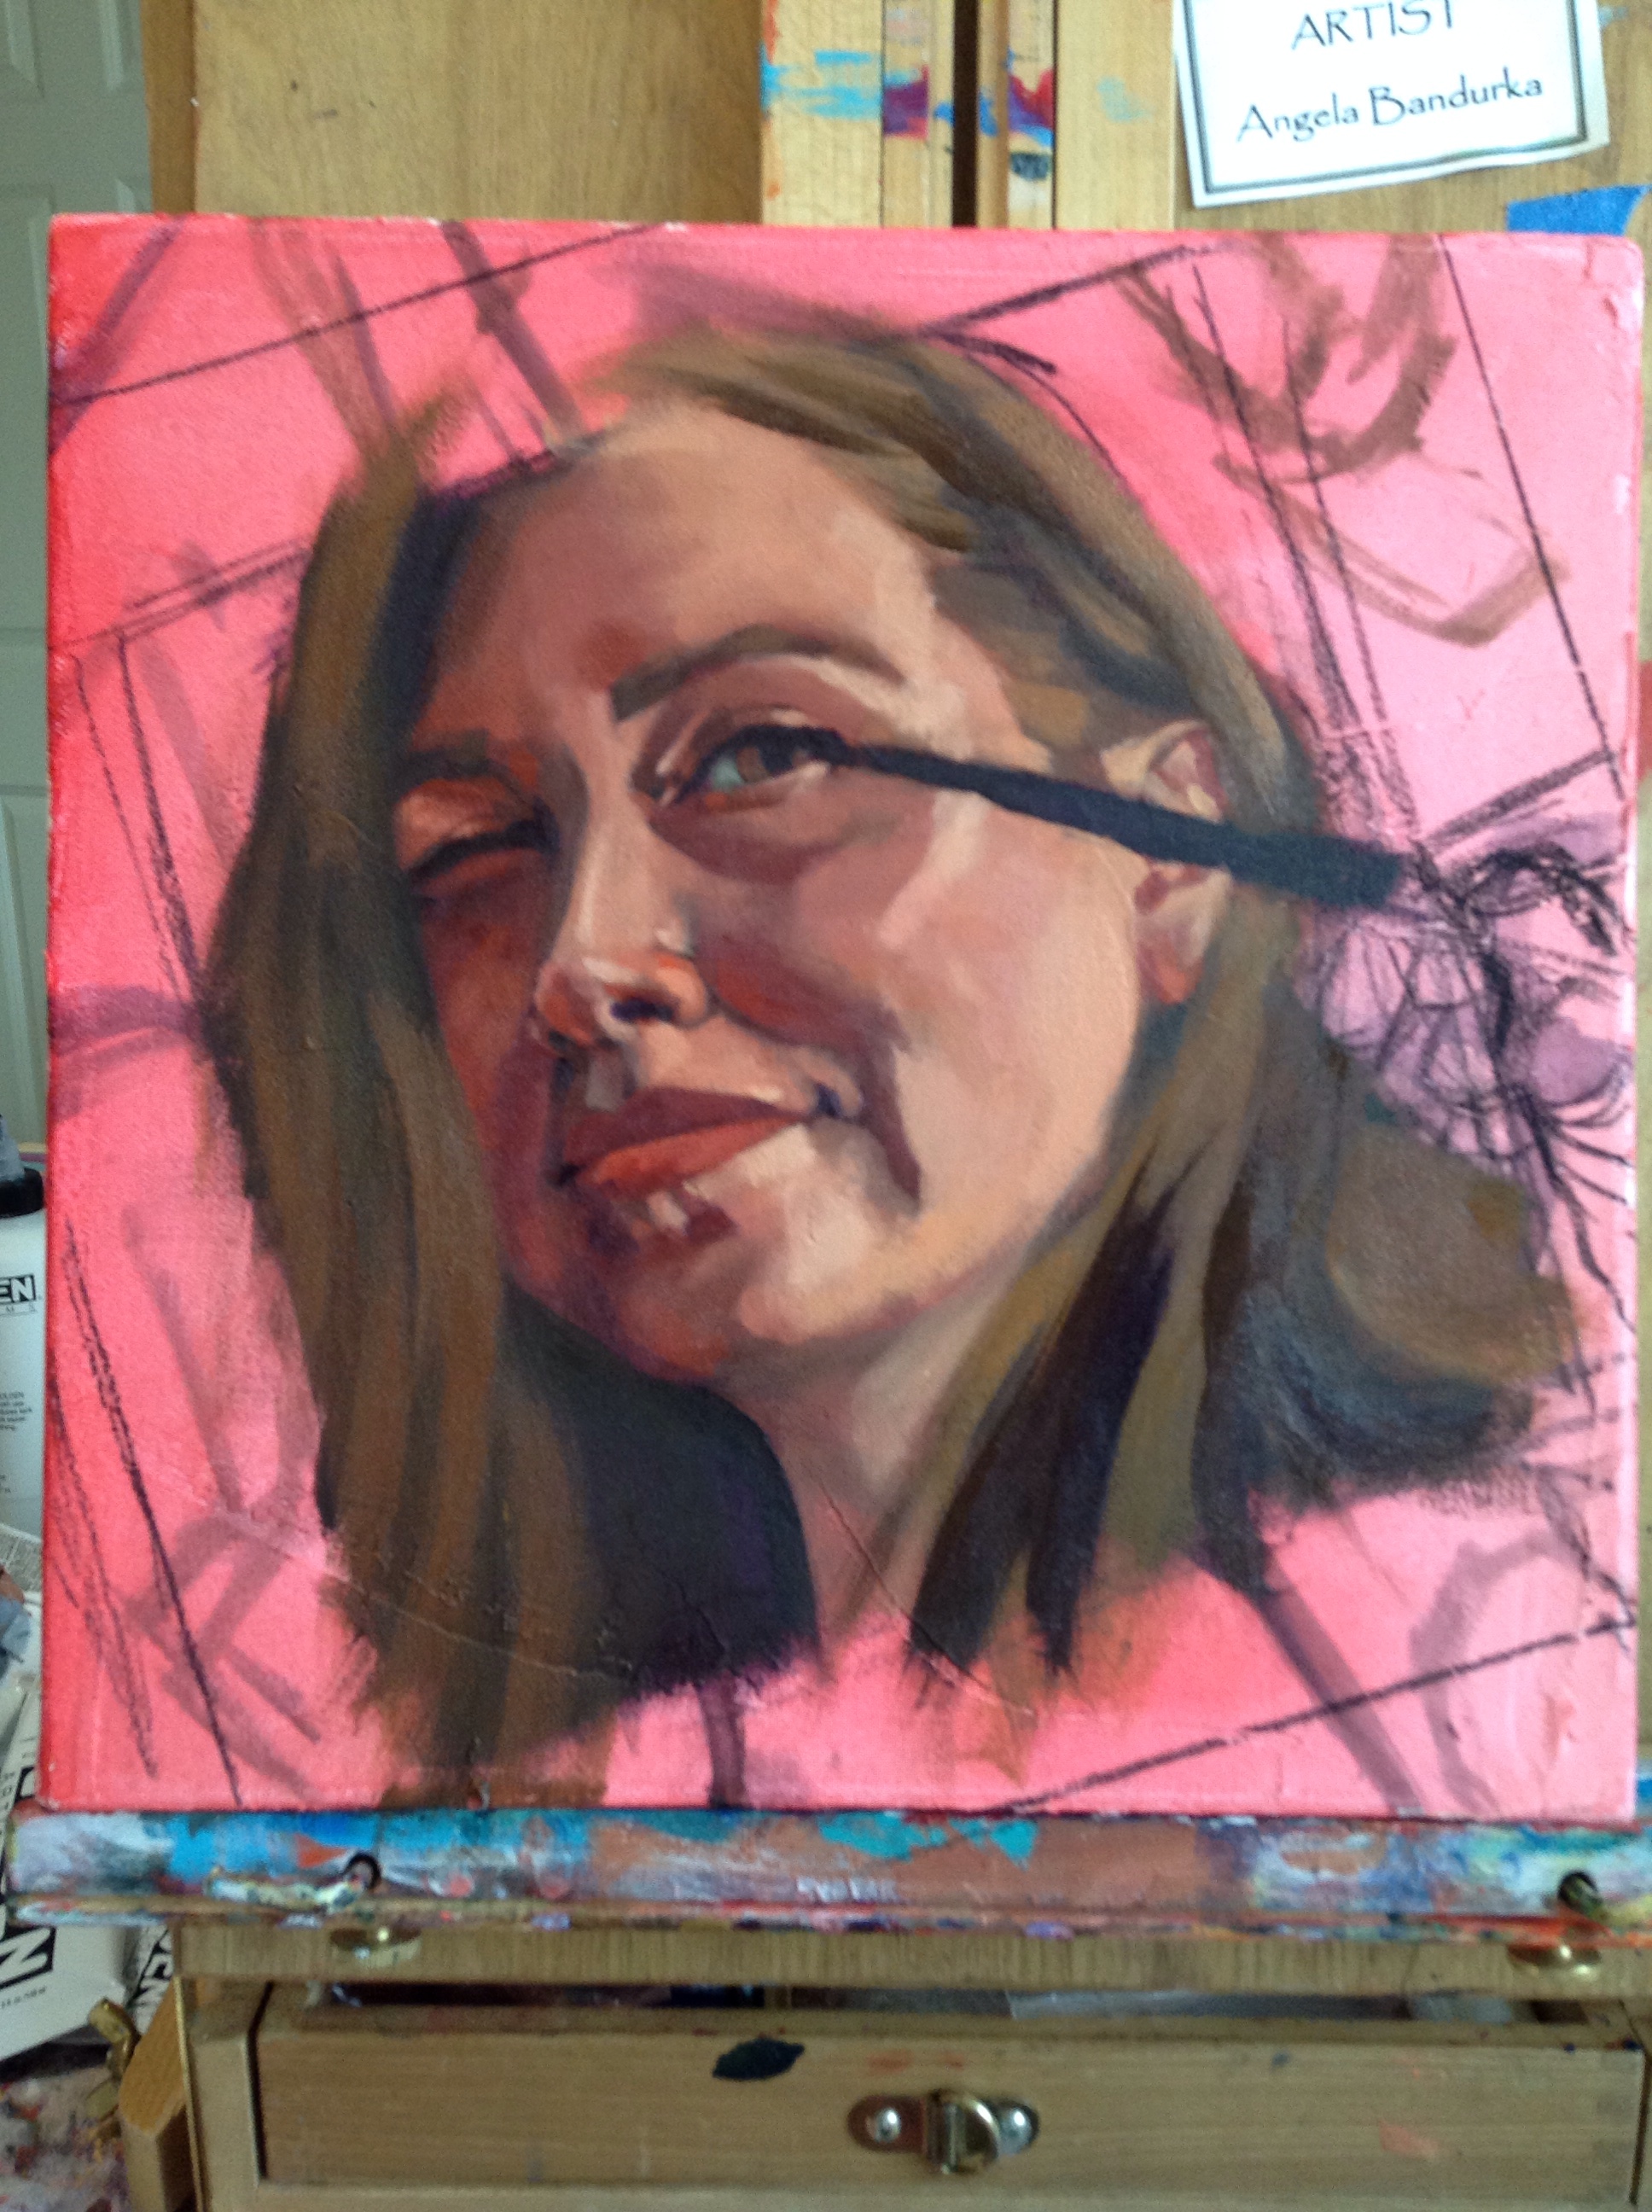
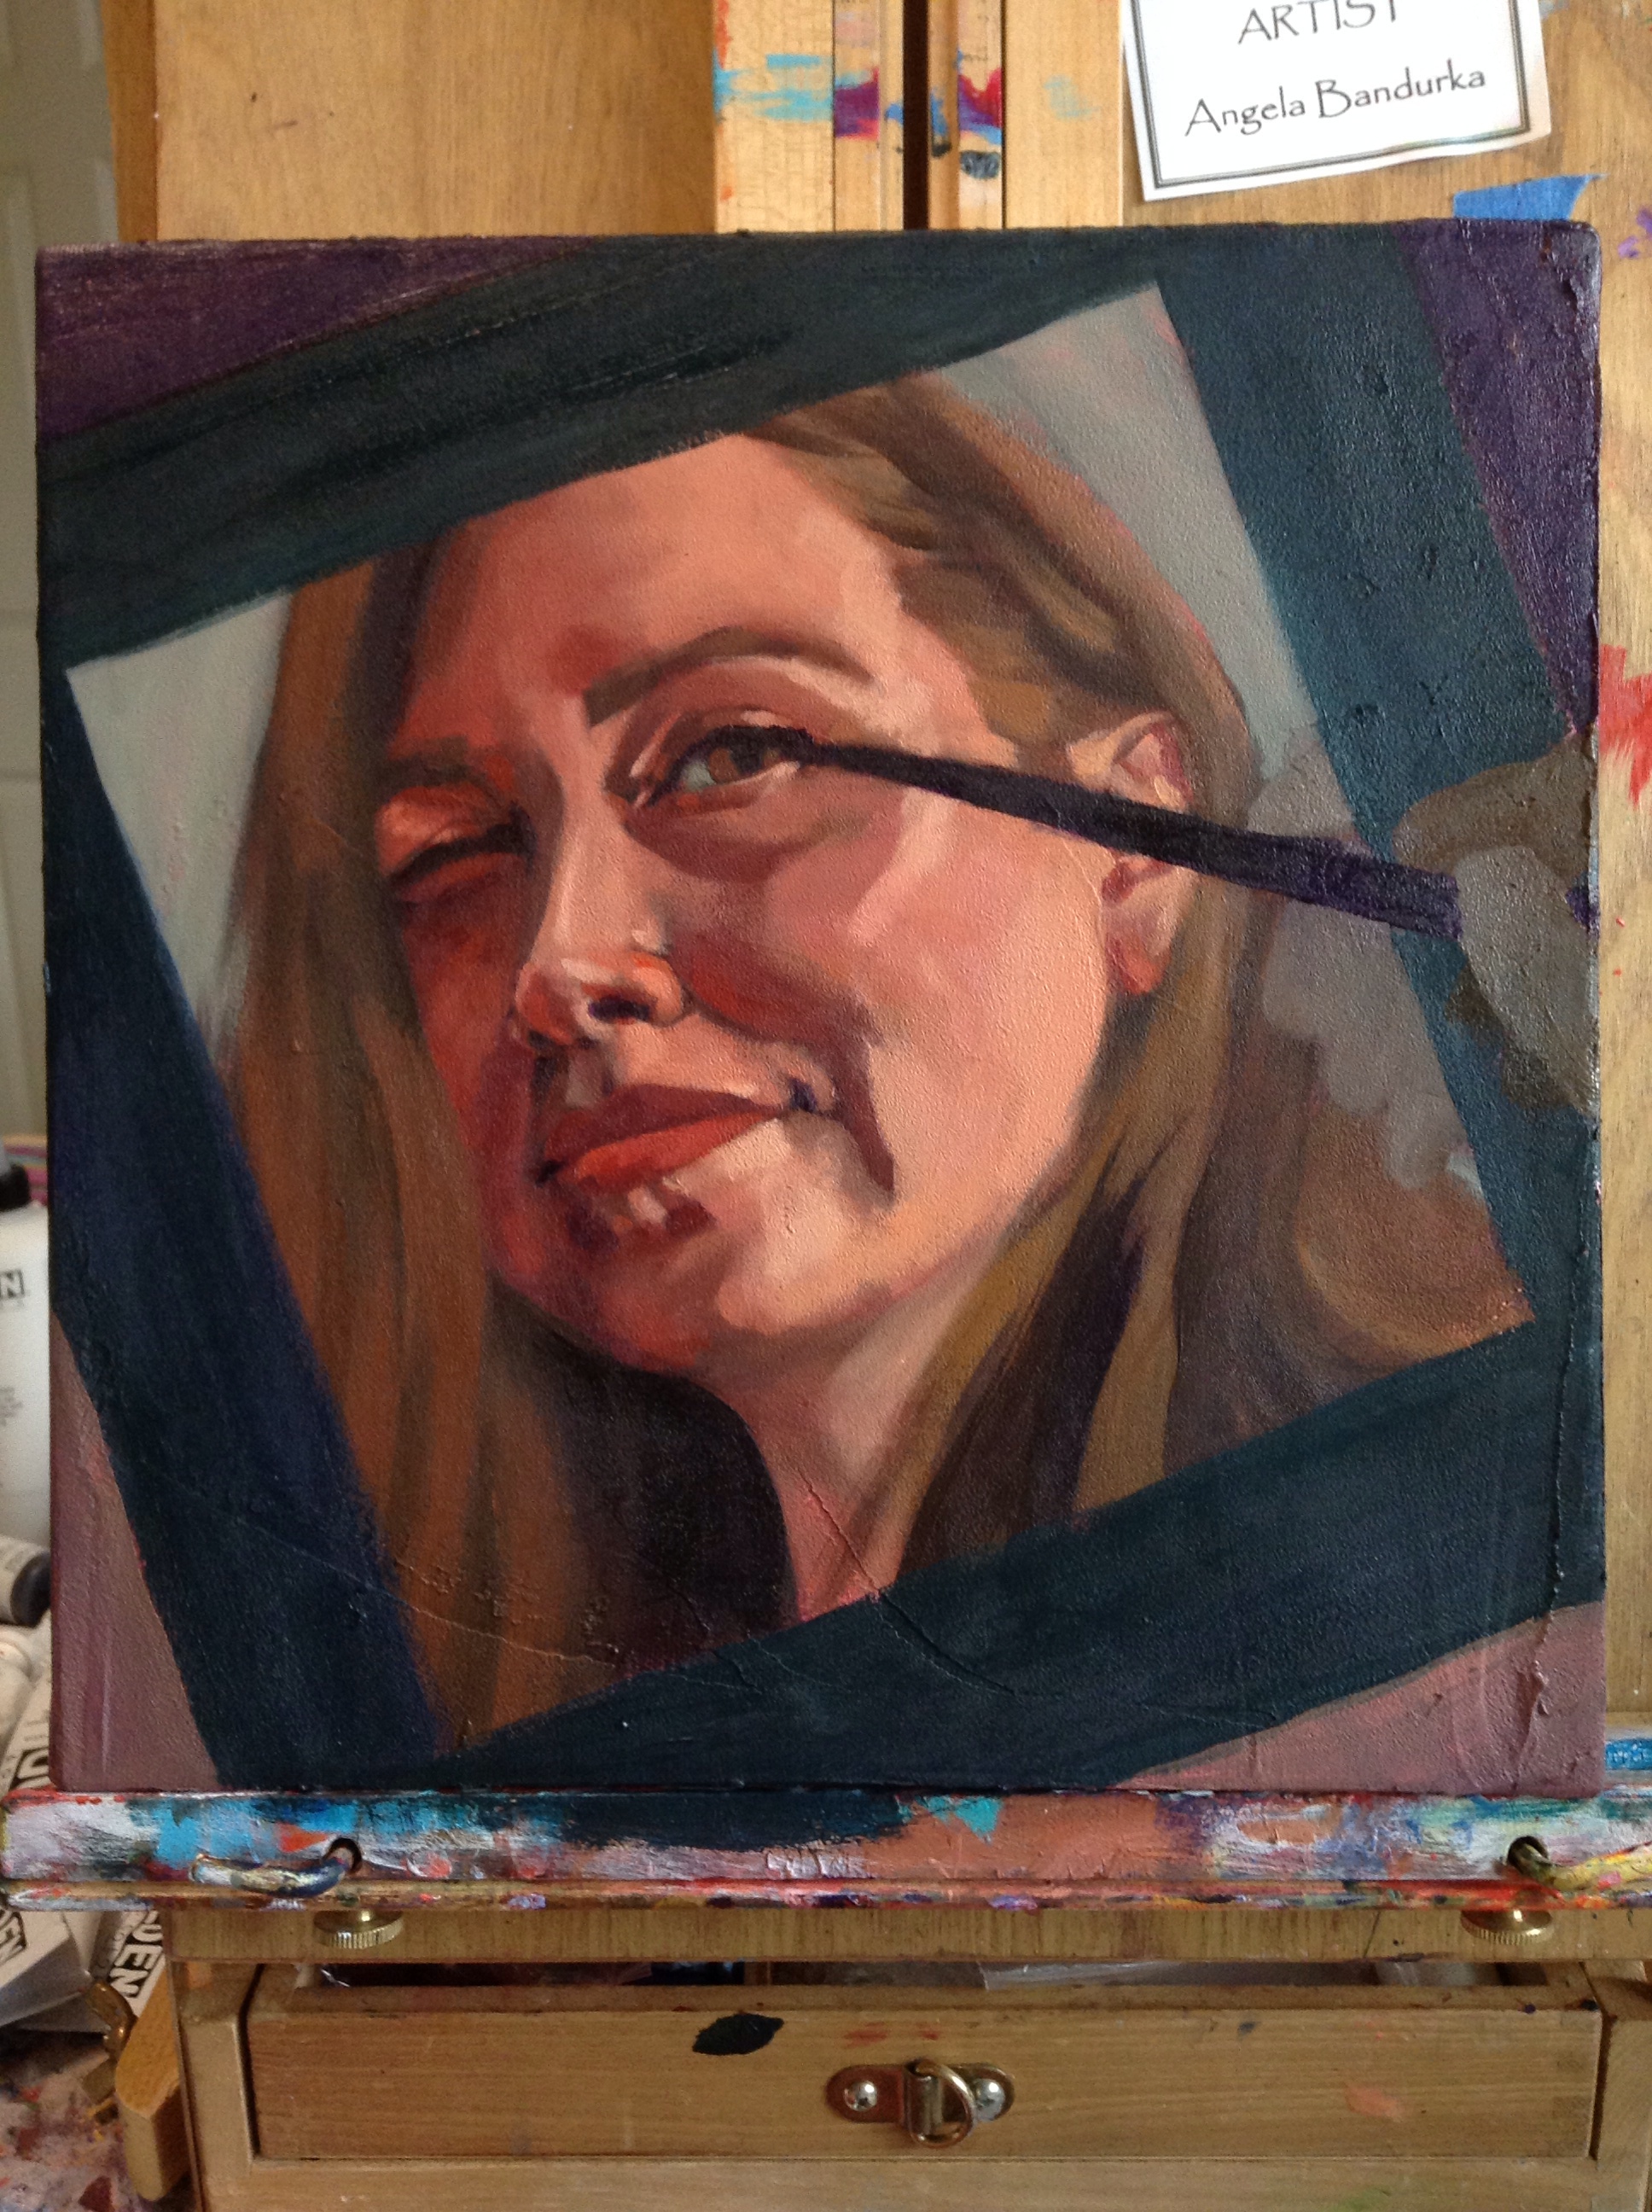
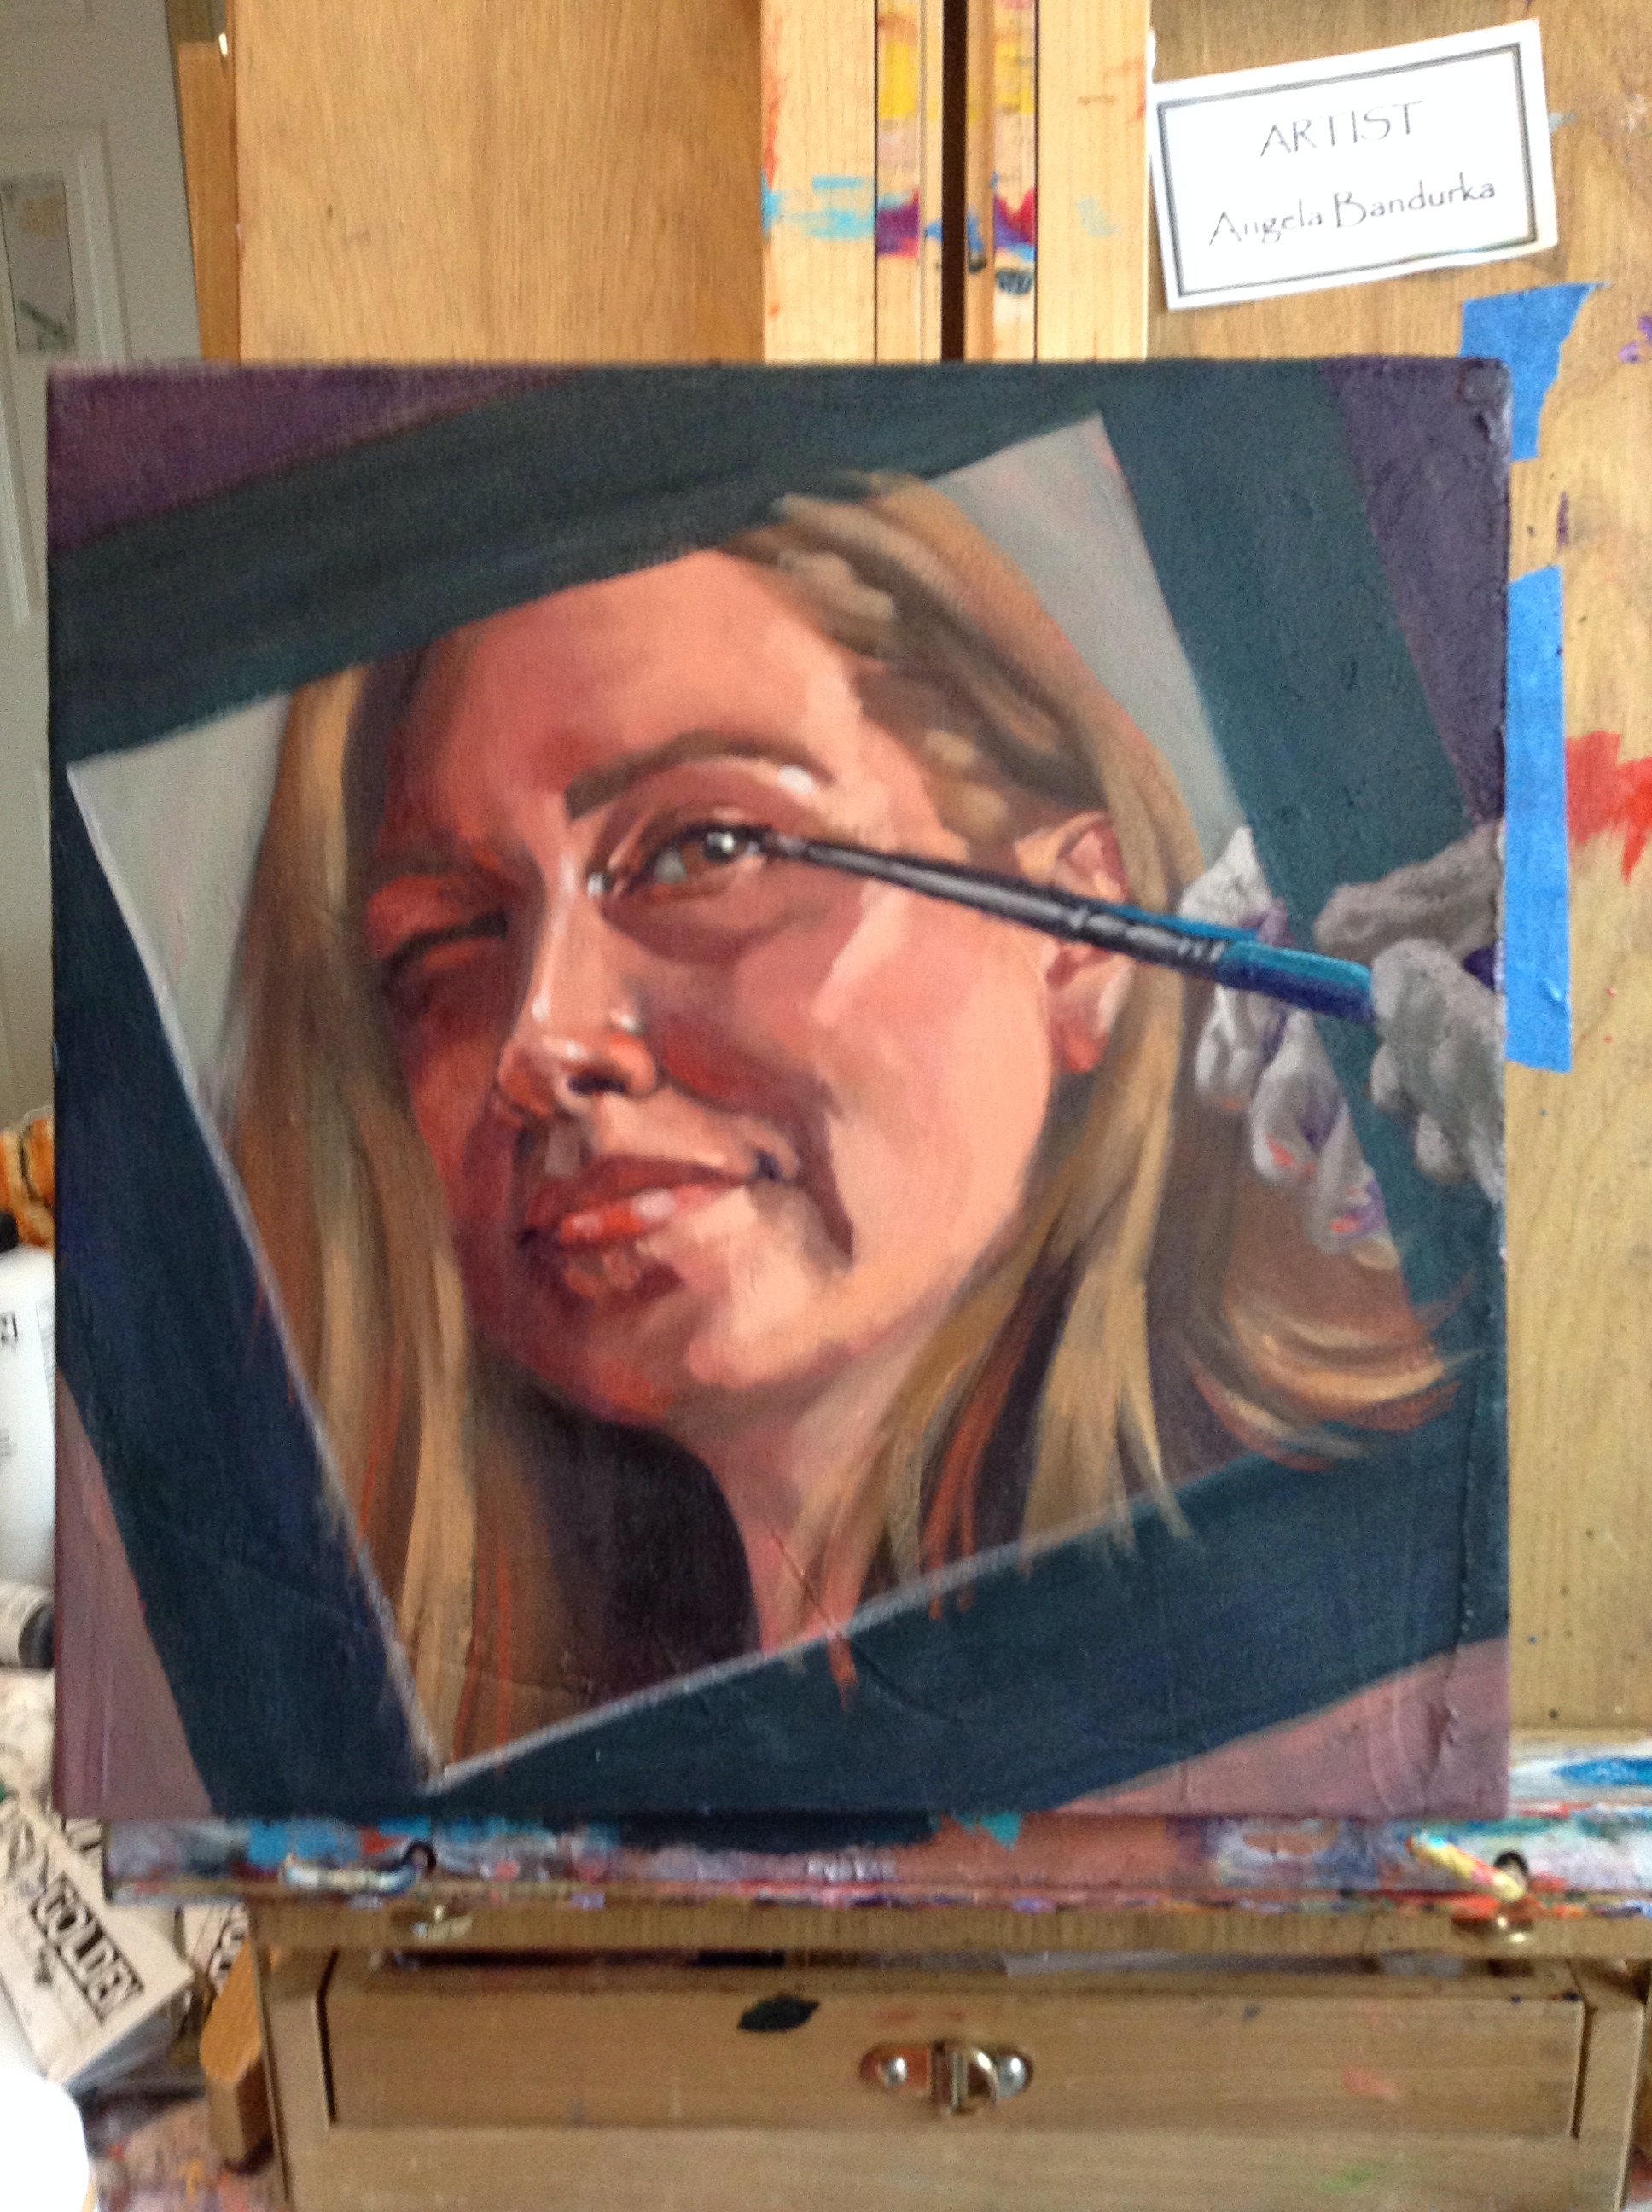
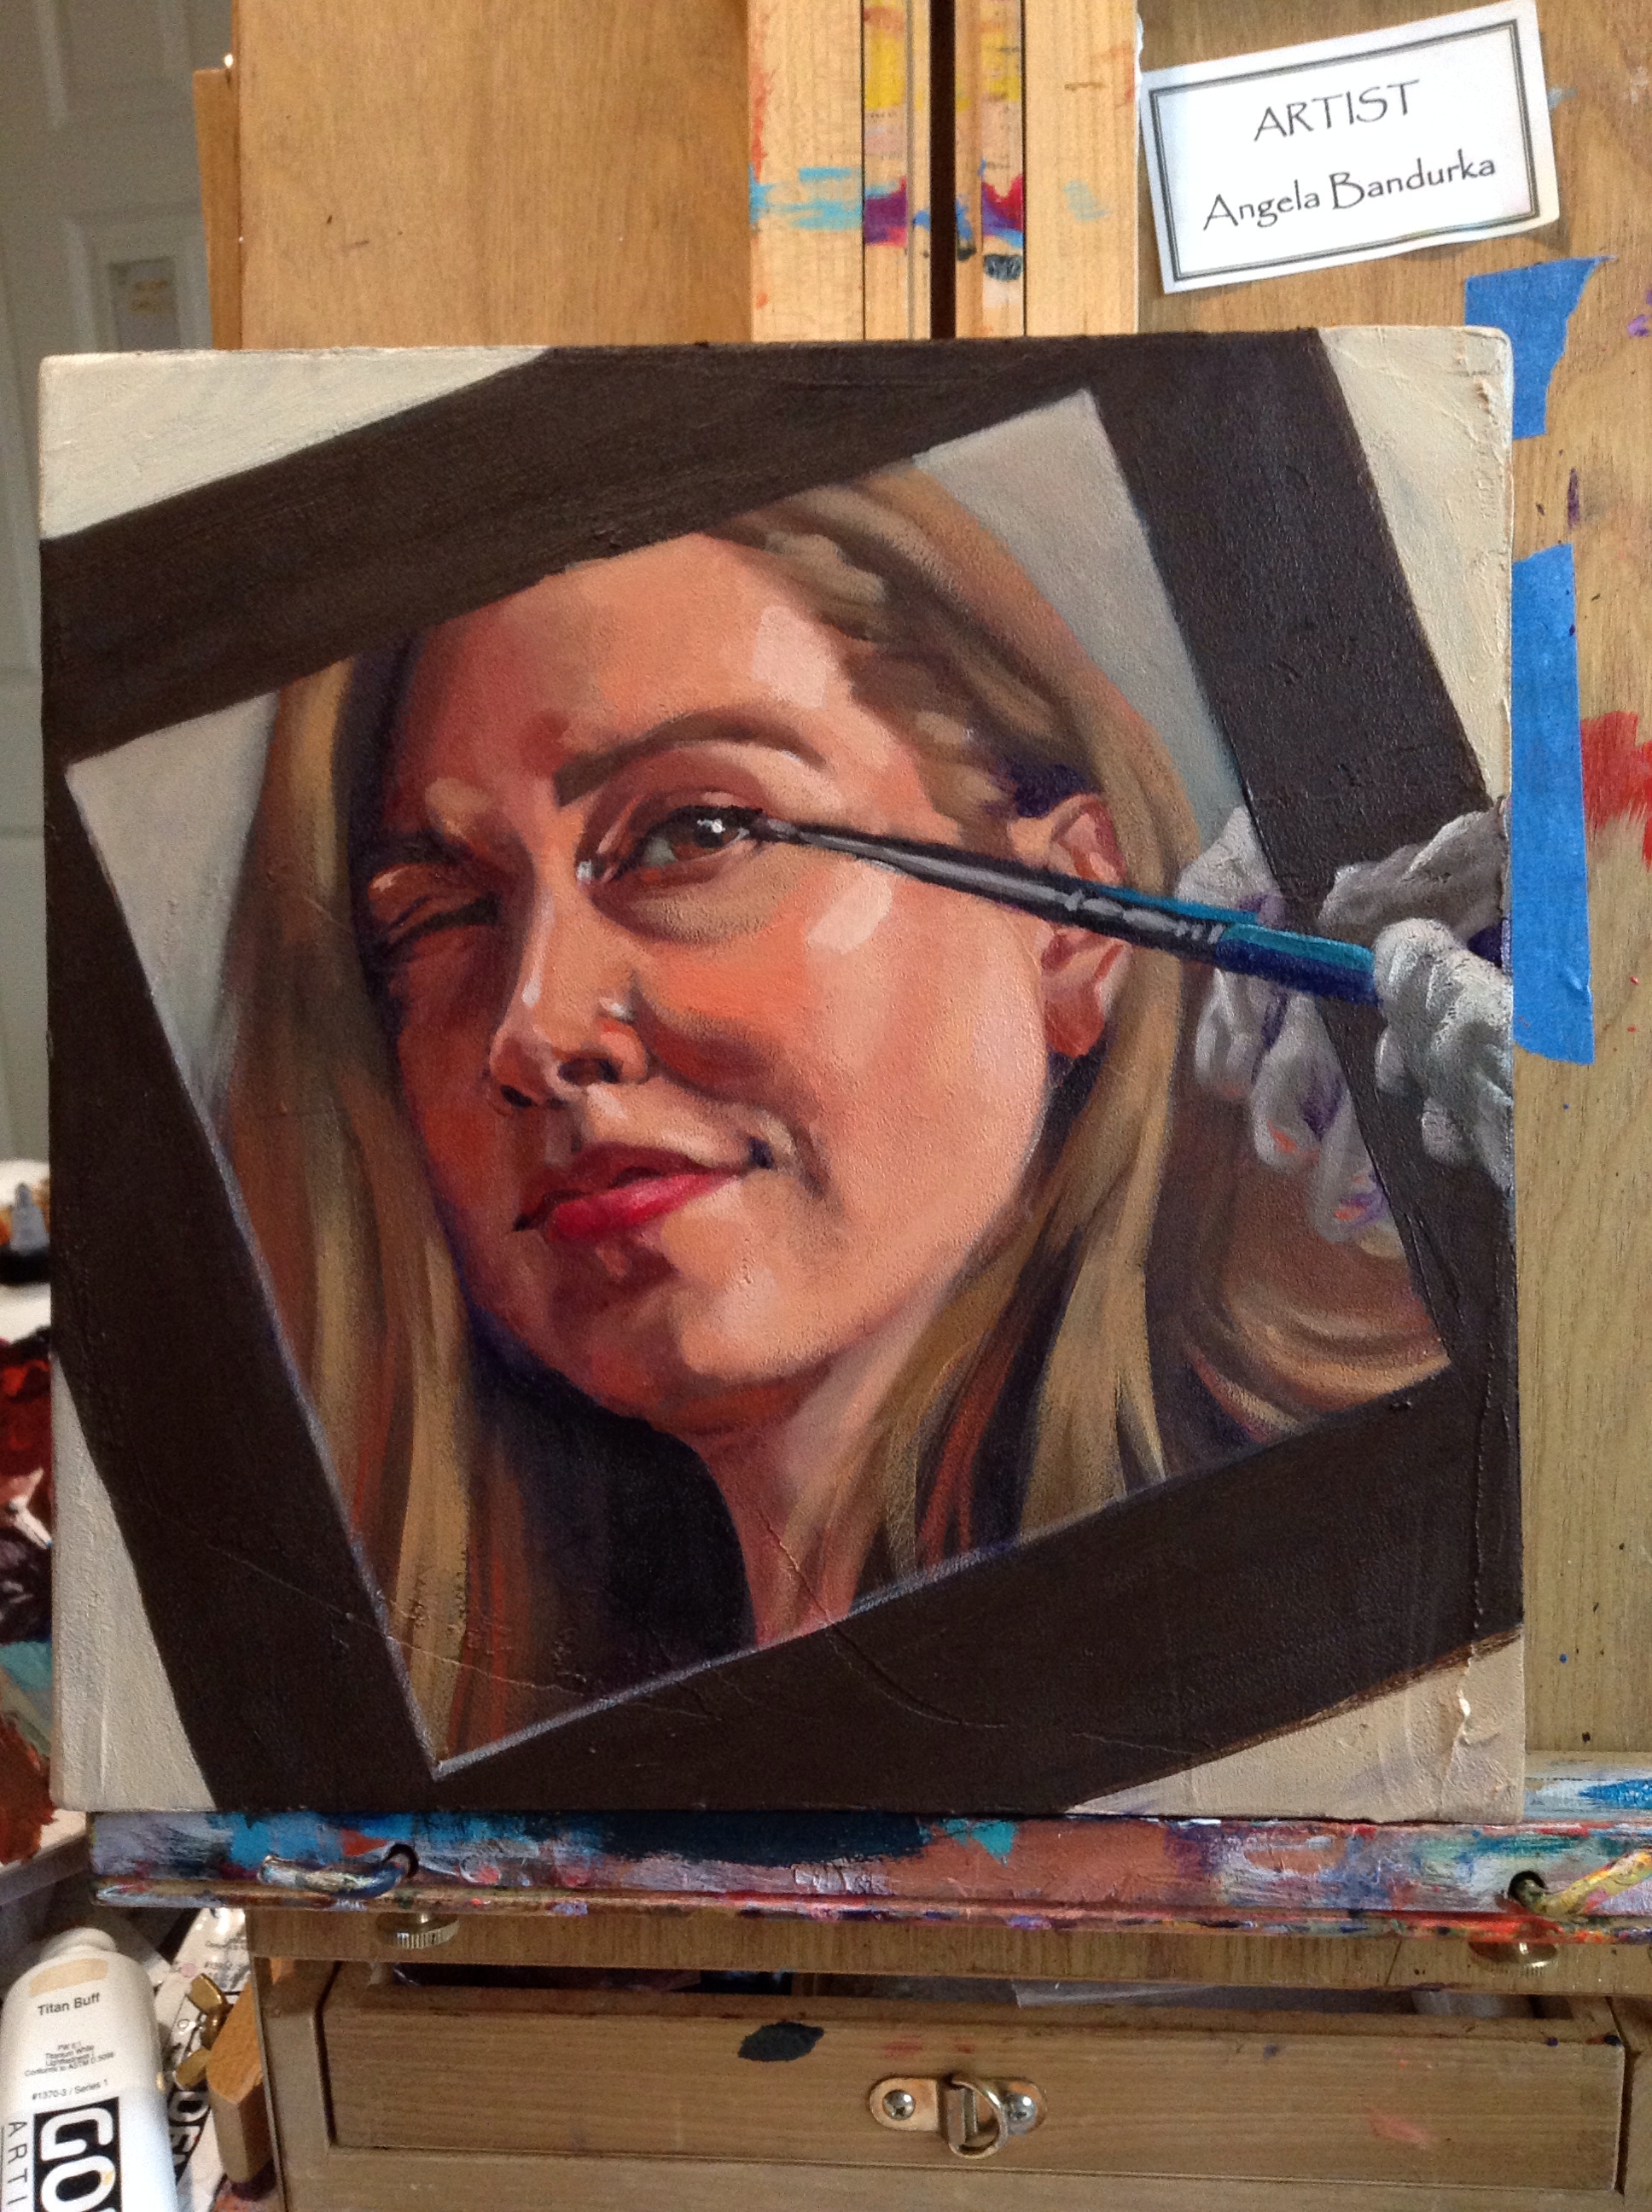
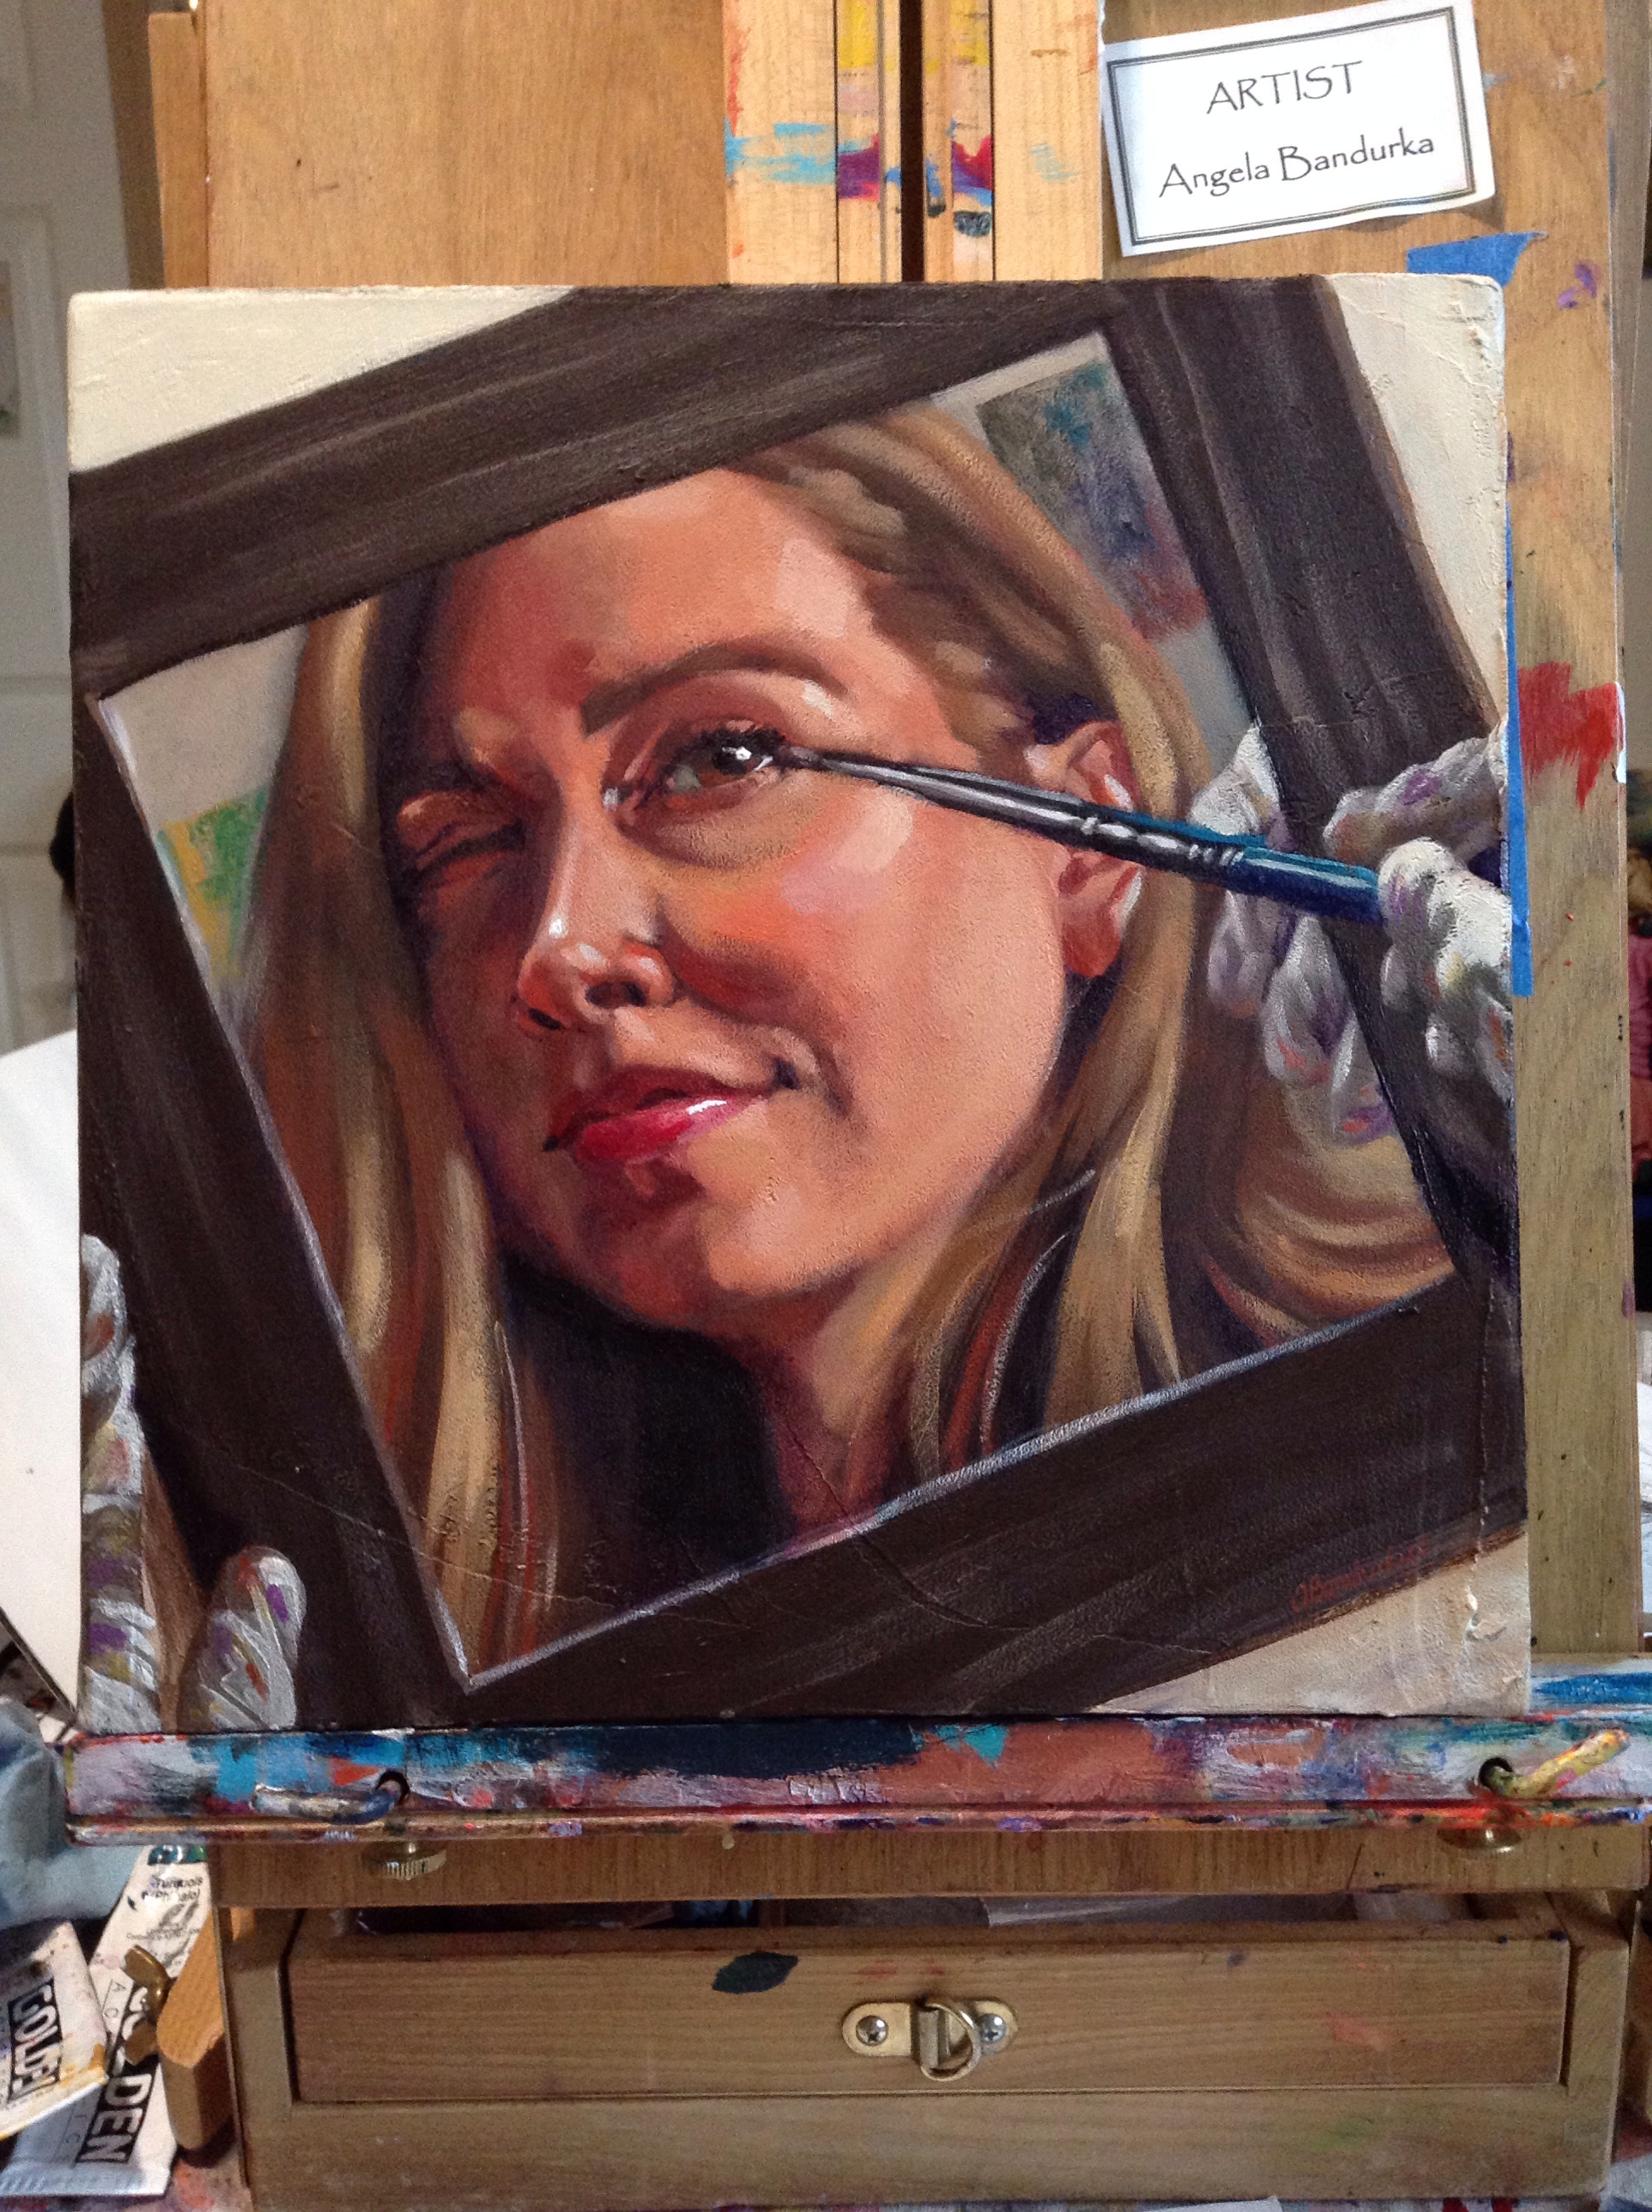
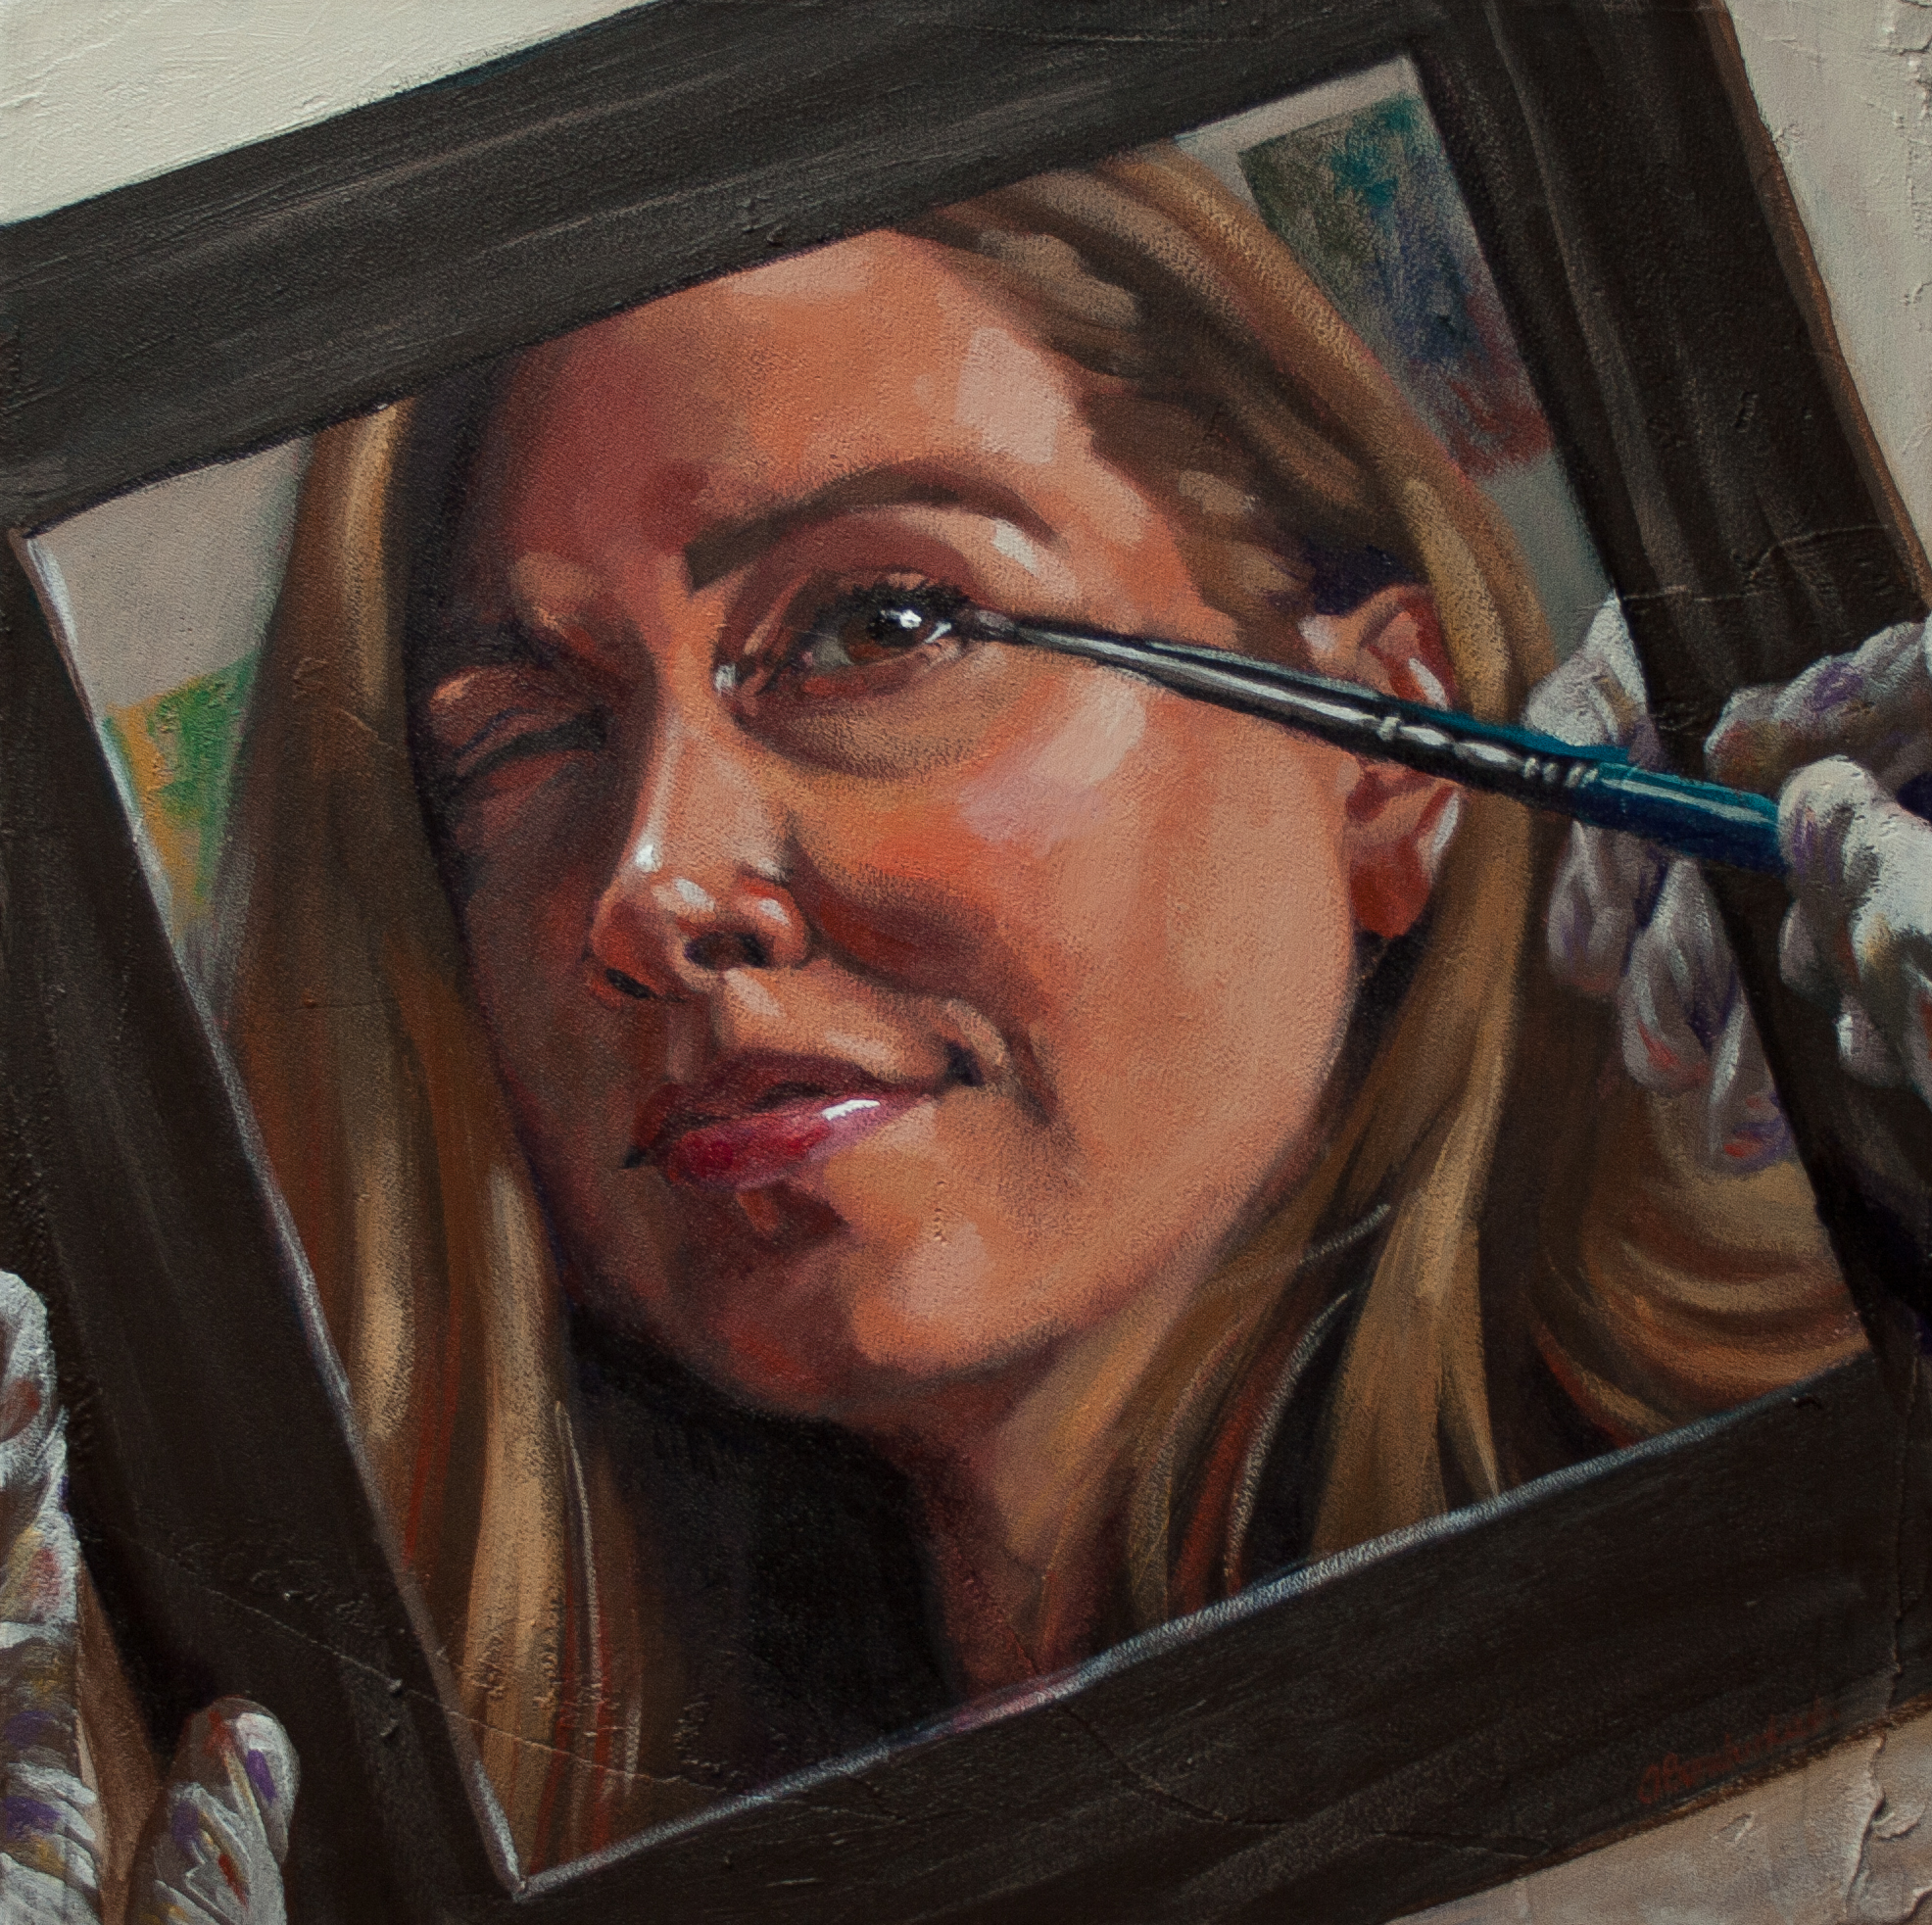
Read MoreThe Original Selfie!
One of the best exercises an artist can do is to paint and/or draw their self portrait. You have a free model to experiment with, and you don't have to show anyone what you've done if you don't like it :)
Back in 2008 I had painted my first self portrait since college. It was a part of the marketing effort my grandmother, Barbara Bradshaw; my aunt, Perry Johnston; and I did to promote our three-generation show at the Gibsons Art Gallery in Gibsons, B.C. Canada. We each did one and those three portraits were used on all marketing materials, and were the first pieces you saw as you entered the gallery during our show.
At the time I painted it, I was going through a new divorce, had a three-year-old and was struggling to figure out my future.
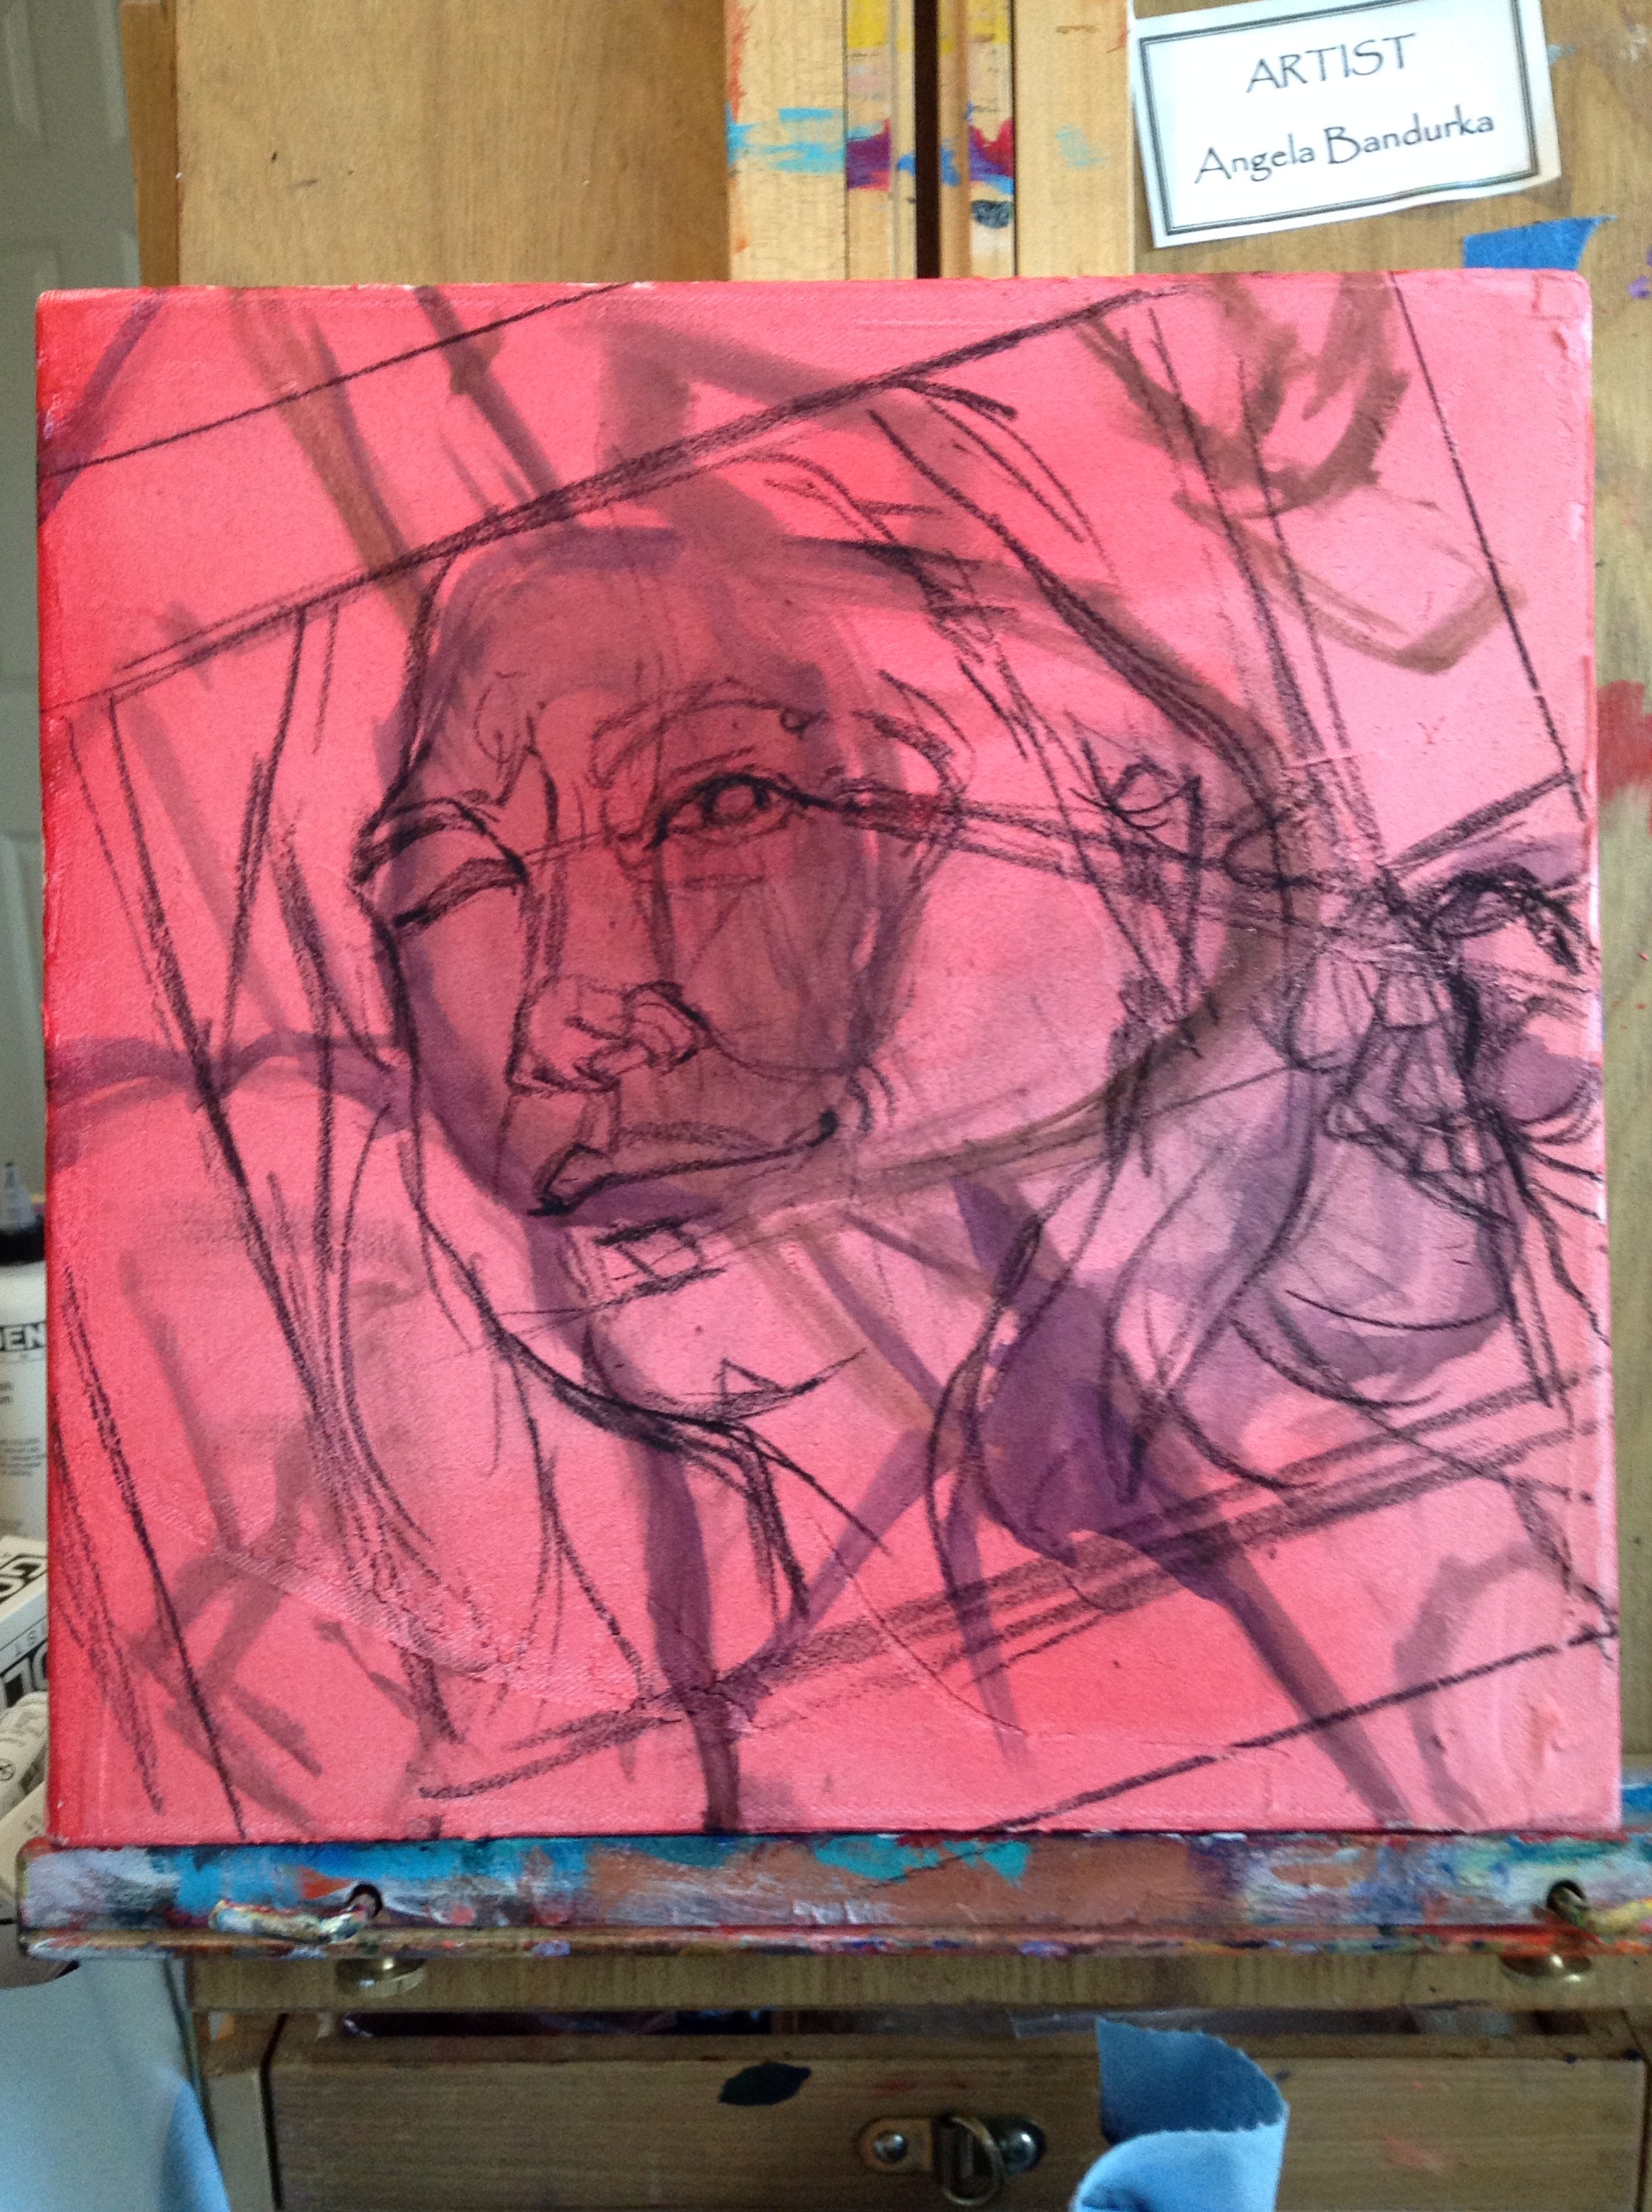
It was time for a new one. This one was in my head for a while before I got around to painting it - selfies are all the rage on Facebook and beyond these days. I thought it'd be funny to do my portrait with those in mind. The Original Selfie.
Here are the steps I took, starting with the best possible photo I could get of my reference material - since I was using a mirror to capture my image, this is all I could get ;) Not one to waste anything, I painted over the sketch of another painting that never did get started.
NOTE: This is purely sentimental -but the french easel I used to paint this belonged to my grandmother :)
Drawing with Charcoal Pencils
I love drawing. Always have! And drawing with charcoal pencils on paper is especially fun. (When I draw on canvas, I usually use pastel pencils, but that's another discussion :)
Recently, while at ARTspot, an art supply store in Edmonds, Washington, I noticed two very similar charcoal pencils made by the same supplier: Faber-Castell. They had the same names on them but different coloured grips: one was tan, and said "PITT CHARCOAL" and the other was black and said the same thing on it. Both had Soft, Medium, and Hard options. What's the difference?
Read on to find out!
Read MoreThe Art of the Critique
One of the most important things we need to learn to do as an artist is critique our own work, and then improve it before sending it out into the world so that everything we put out there is satisfactory to us.
It's also one of the most difficult.
Getting feedback from others can help, as well. It's gratifying when you hear positive feedback, and can be downright depressing when there is a negative comment, piercing your heart and popping it like a balloon. It can also make you second guess your decisions and change your vision based on others' opinions. A lot of these points can come in handy when you get unsolicited advice, as well ;)
Below are some guidelines I've come up with for myself when asking for a critique from others:


“The two kinds of perspective that artists use are linear and atmospheric (or aerial). Linear perspective uses lines and vanishing points to determine how much an object’s apparent size changes with distance. Atmospheric perspective deals with how the appearance of an object is affected by the space or atmosphere between it and the viewer. Italian Renaissance Master Leonardo da Vinci noticed this latter phenomenon and dubbed it ‘the perspective of disappearance.”
DO ask your peers or betters for an honest critique of your piece.
DO, if it's 'finished', start by having them critique your piece without making any statements before. No excuses, no hemming or hawing. Just put it in front of them and ask them to critique it. If you still have work to do on it, explain what you're going to do on it and that you'd like a critique on the work done so far and how they might proceed if it were their piece.
DO listen quietly while they critique your work, adding your thoughts if they are constructive only.
DON'T make excuses or get defensive for any reason.
DO write down or make mental notes of the points that you really believe will improve the work, and then actually apply them to the piece!
DO thank the person critiquing your work, even if you didn't agree with them.
DON'T feel like you have to apply everyone's opinion to your work. You don't want to make your creation a Frankenstein.
DO stay true to your own vision! And you don't have to say that to do it - it'll only ruffle feathers.
DON'T ask your loved ones to critique your work unless they are a legitimate peer. Your Mom will love anything you make. It doesn't count. This also applies to Facebook friends as a whole. You can single out specific peers online through Facebook or other venues to give your constructive feedback, but be careful that you're not just looking for personal gratification, it is fleeting and not necessarily constructive (even though it feels pretty good!)
DO consider starting a critique group of a few close peers that meets regularly to help each other out!
NOW: How do I go about critiquing my own work? The checklist below is one I use regularly to determine if a painting is "done" or not:
“Sometimes when I’m having a colour moment I think to myself, okay what would be the most disgusting colour to add here? Sometimes that ‘disgusting’ can turn out to be ‘surprising’ and ‘completely gorgeous’. ”
BEFORE PAINTING:
Viewpoint & Composition
- Do you need a thumbnail image to see the best design for the piece?
- How is your negative space?
- Are you happy with the viewpoint? Should you try getting down low, cropping in close? Experiment.
Drawing:
- Are your relative distances/sizes about right?
- Does it look right when you check it in a mirror?
- Try drawing it upside down and looking at the shapes more closely.
- How is the perspective?
- Are any horizon lines straight? Do they need to be?
Texture:
- Do you like the texture of your surface or do you want to embellish it?
- Have you properly prepped any raw surfaces (like untreated wood)?
WHILE (OR AFTER) PAINTING:
Value and Depth
- Try using a B&W version of your resource to see your values - photocopy or revise your image using a photo editing tool (or red acetate if you're painting plein air)
- Is the background light enough to push backwards?
- Are your foreground darks standing out?
- Is your focal point an area of high contrast? That’s where the eye will go first!
Texture:
- Do you have visible brush strokes - and do you want them there or not?
- Are your final highlights thicker than all other layers? Would it add or detract?
- Is the most detail mainly in the area you want people to focus on?
Color:
- Have you put your most saturated colors in the foreground?
- Is the background (things off in the distance like mountains) less saturated?
- Are the warmest colors in the foreground?
- The receding shapes colors cooler in temperature?
- Do you need to break the temperature rules? Does it still work?
- Are all the values of each color right? (do you need to darken/lighten?)
- Have you isolated the color to verify? (Using a pinhole)
- Try using a funky color - like a yellow sky. Check the values and if they're right, it'll probably work!!
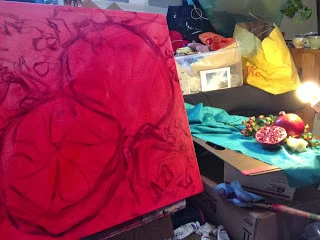
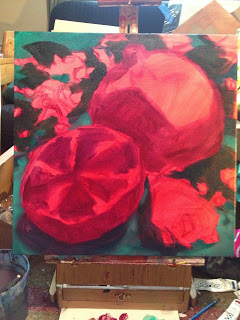
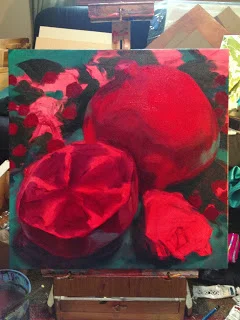
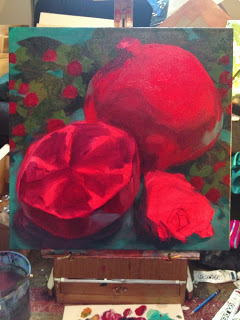
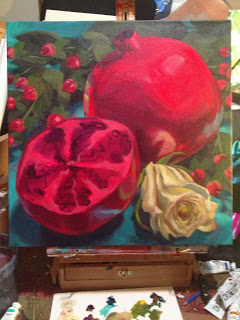
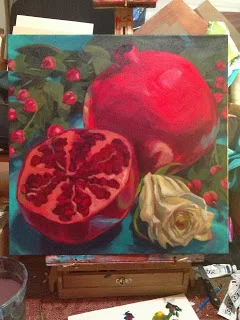
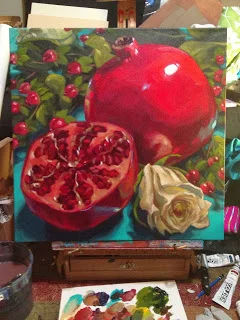
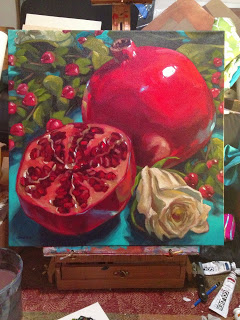
Painting Pomegranates, Step-by-Step
These are step by steps of a painting of pomegranates I began today :) I'll post a final picture of the painting tomorrow.
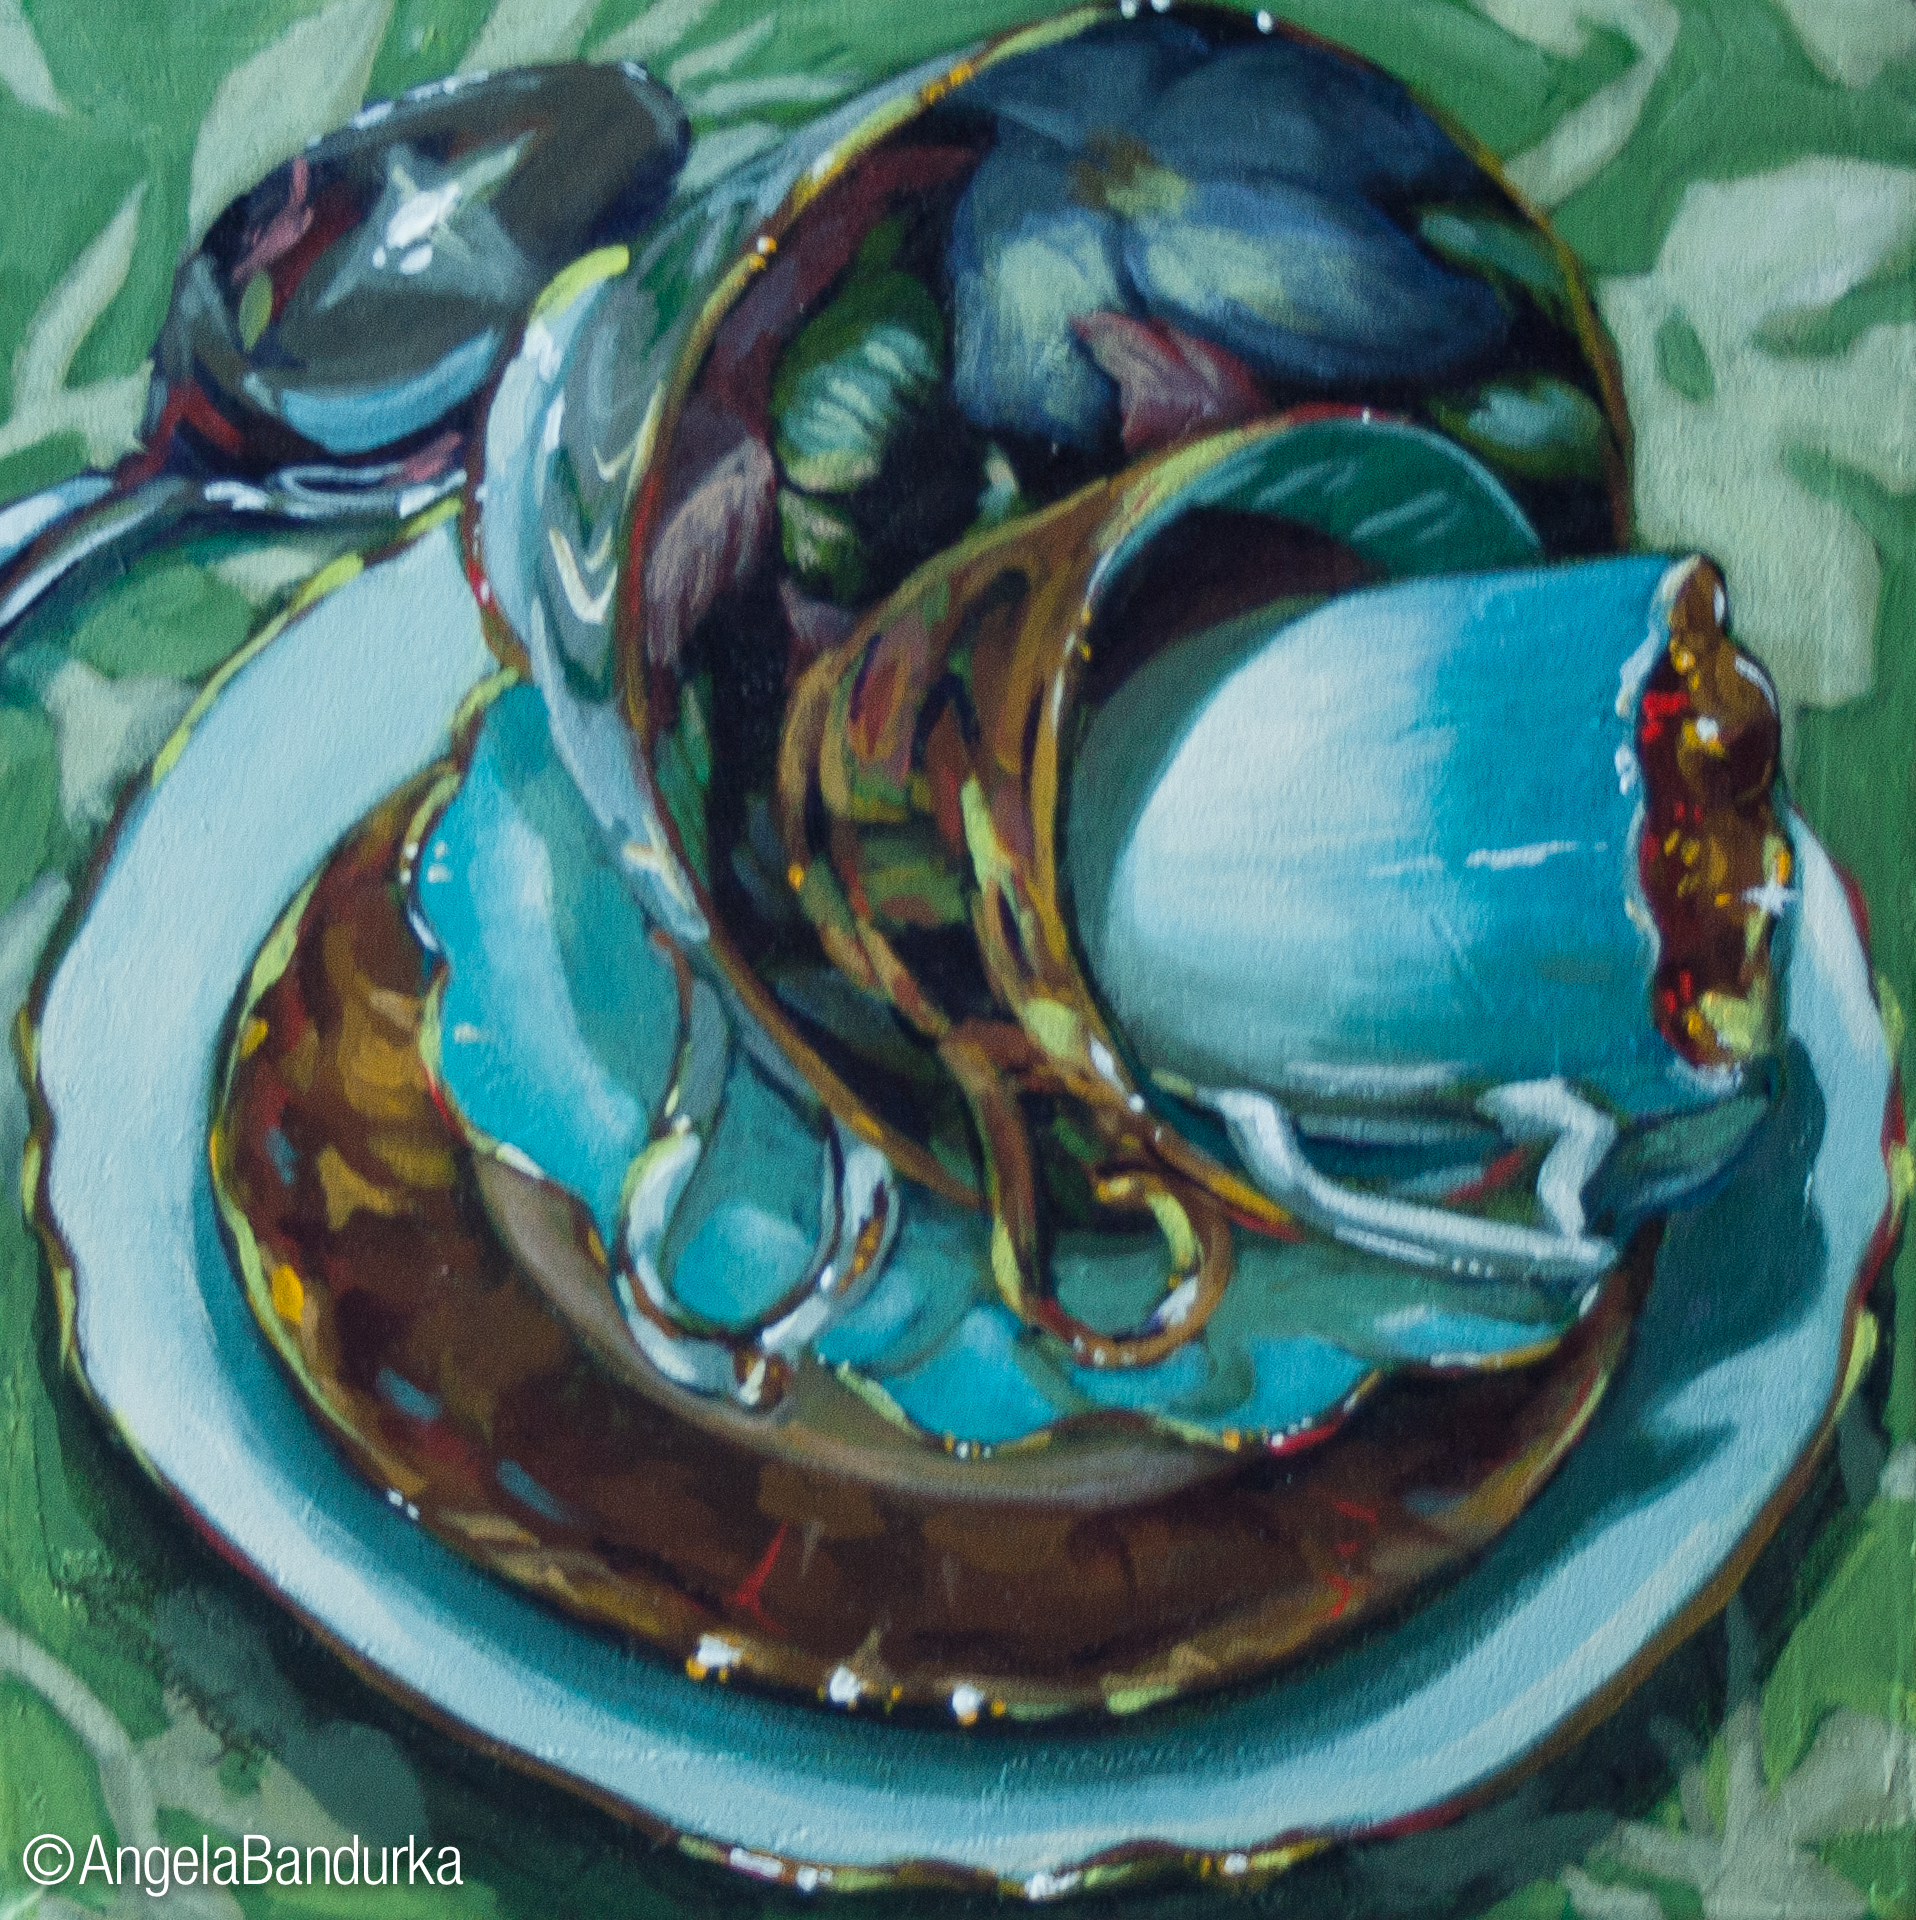
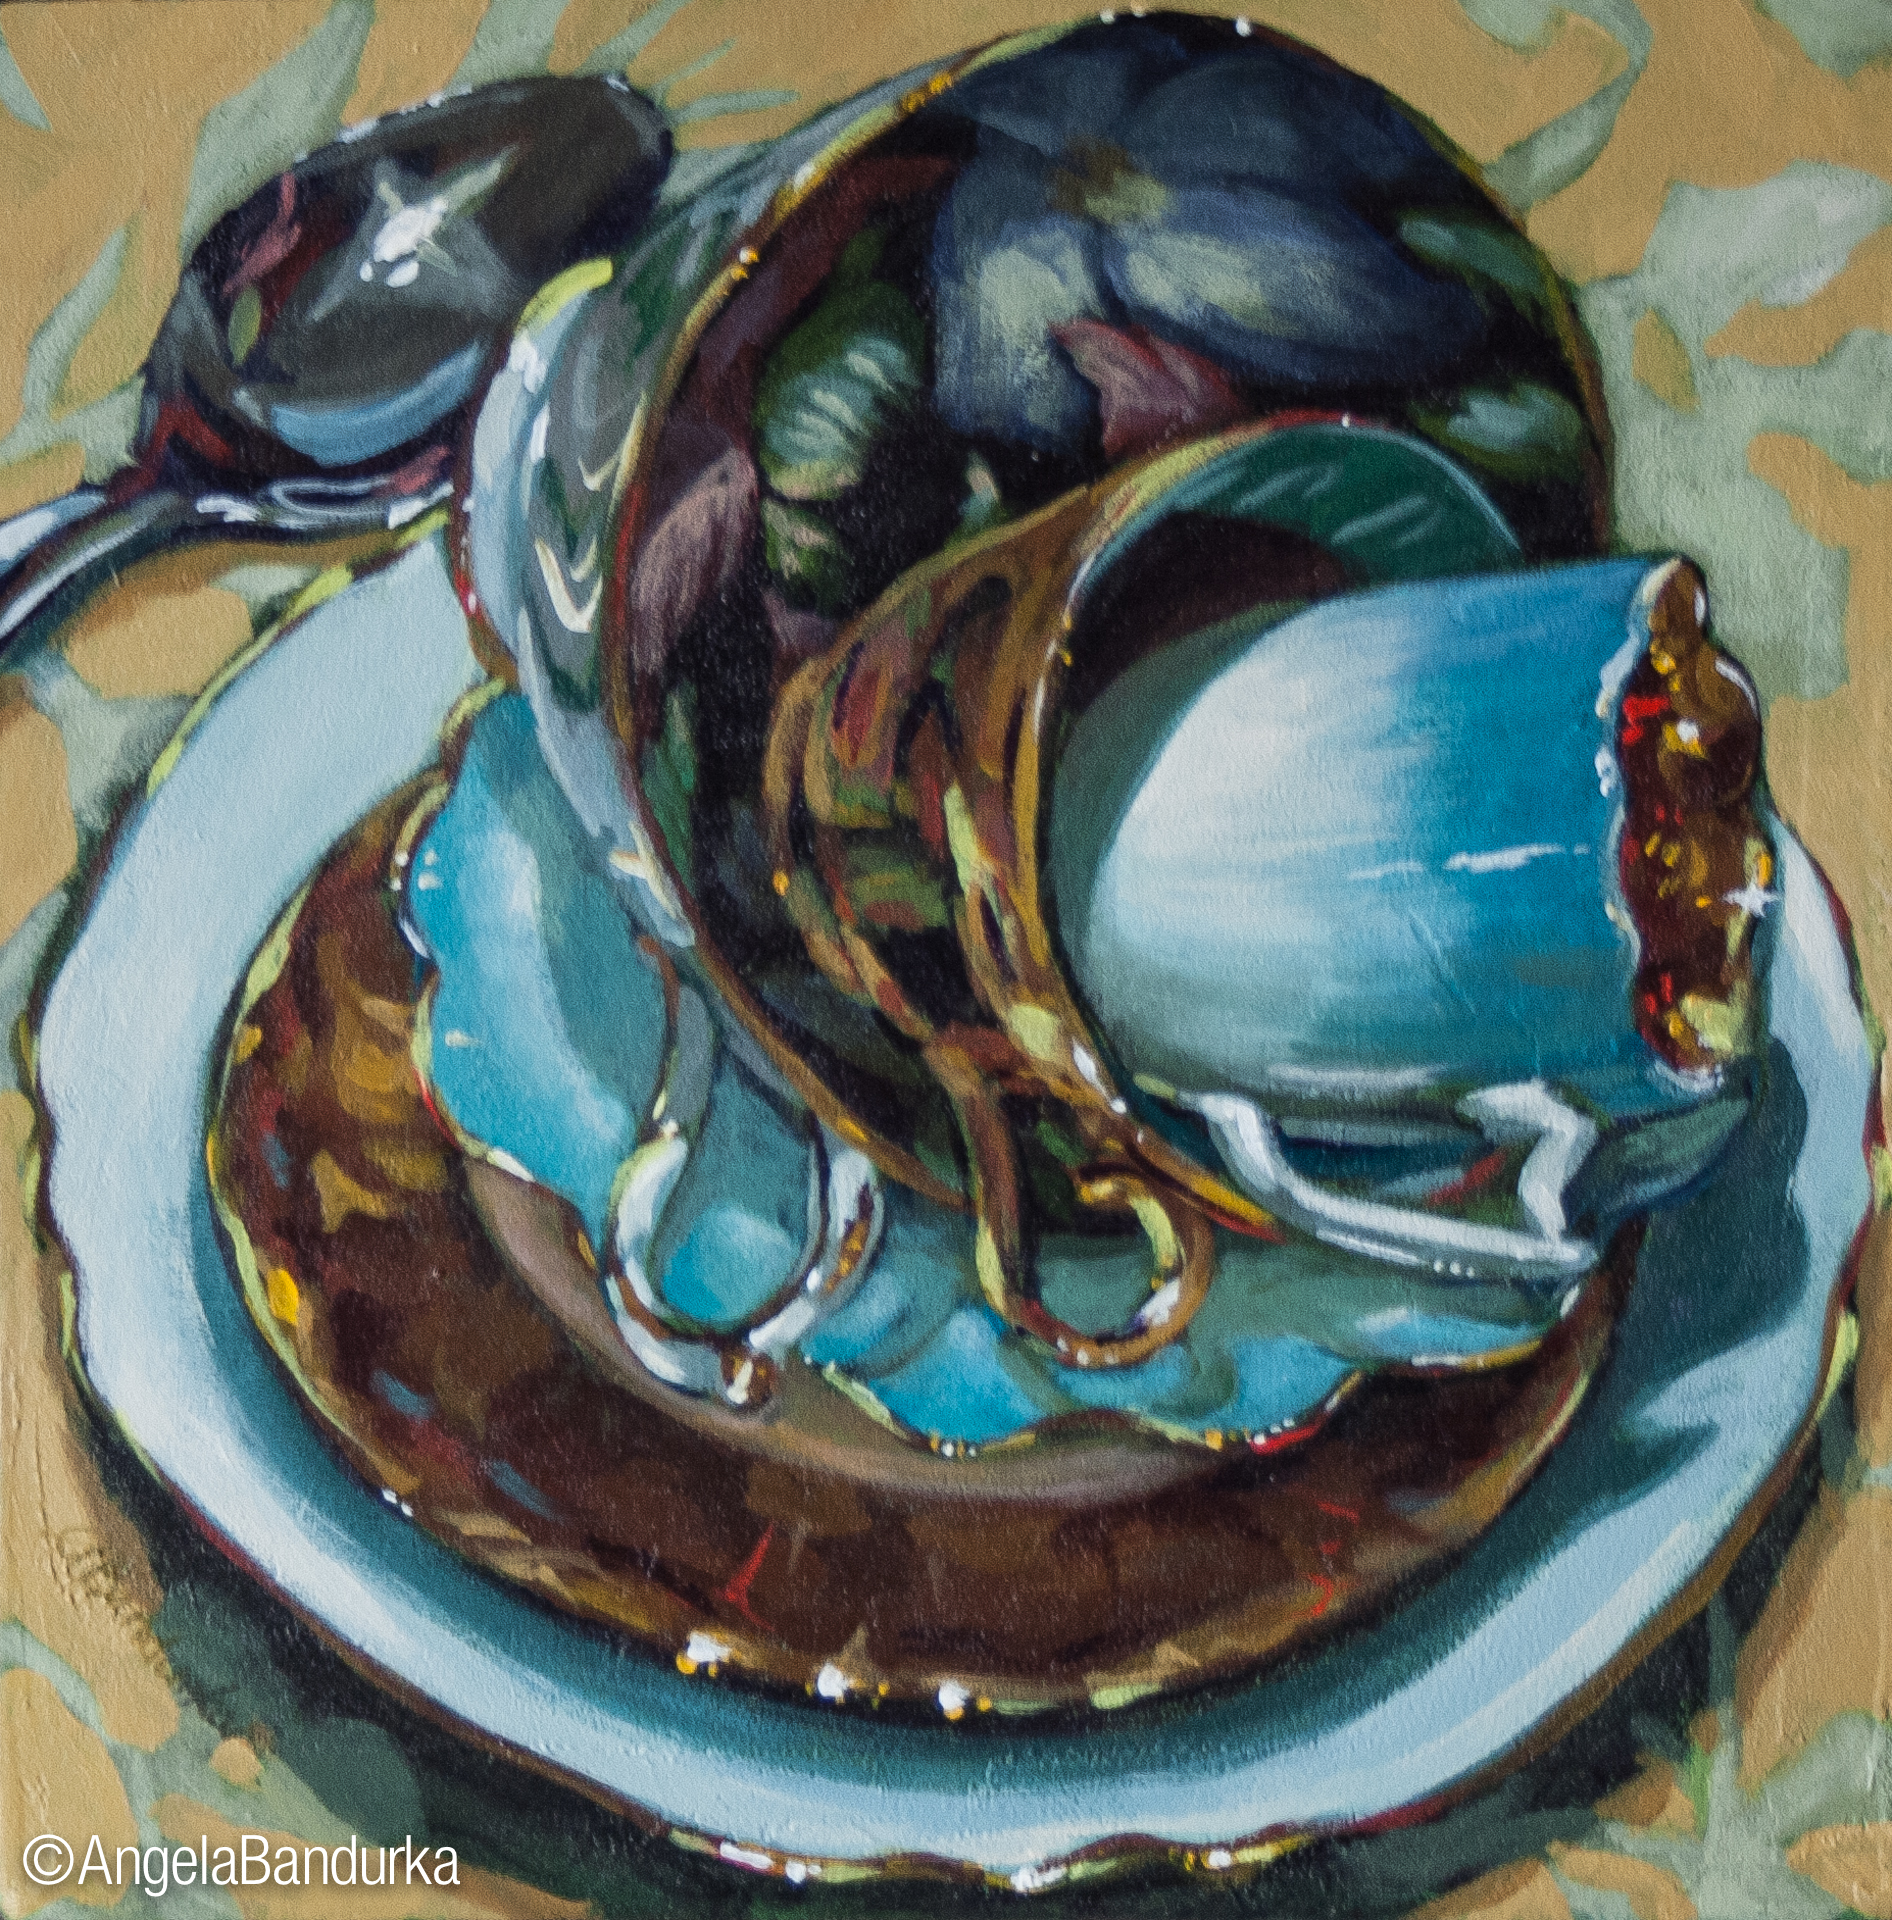
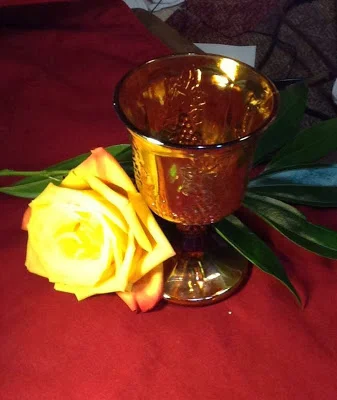
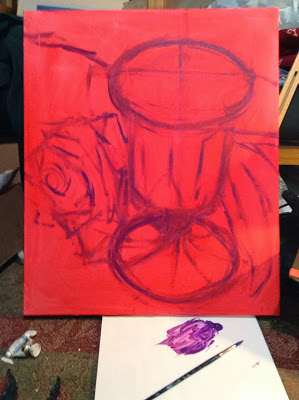
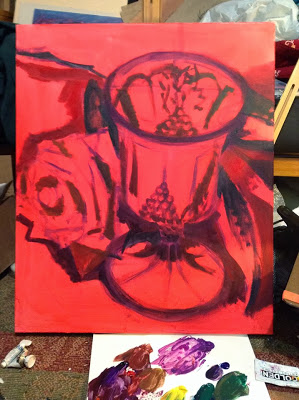
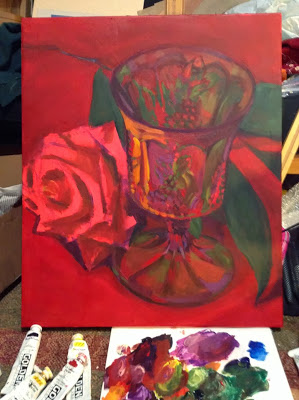
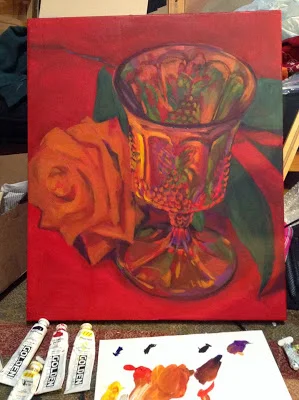
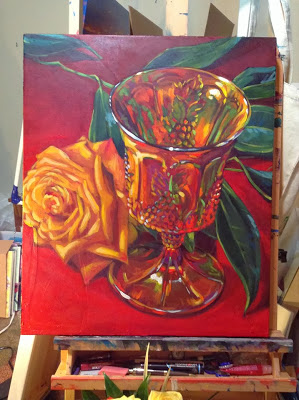
Painting Carnival Glass, Step by Step!
Yesterday I was painting with a friend, Bonnie Black, and noticed some really cool, iridescent yellowy glass bowls on her counter. She said that there were called "Carnival Glass" and were given out when you went to the movies during the earlier half of the century. She sent me home with a glass and bowl to borrow and paint; and so last night I decided to take the challenge of this glass online. Setting up the scene in my studio with the glass, a rose, and some greenery, I decided to post my progress on facebook for my friends and followers to watch.
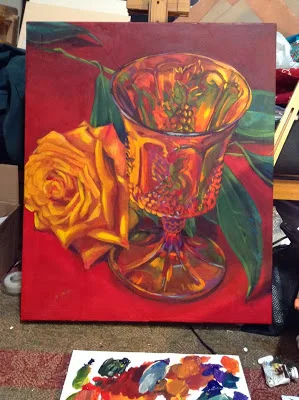
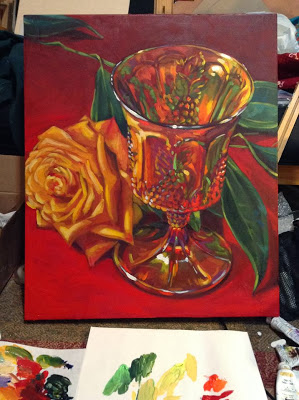
Here is the full night's work - from just after quarter to 7pm until 11pm or so:
The set up - it was on my right side, lit with a strong spotlight on the left that clipped to the table. I painted from life, and this is a great example of why that's important - you just can't get all the richness and variety of value and colour when you paint from a photo!
And so it begins:

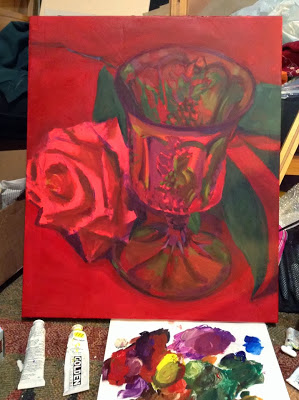


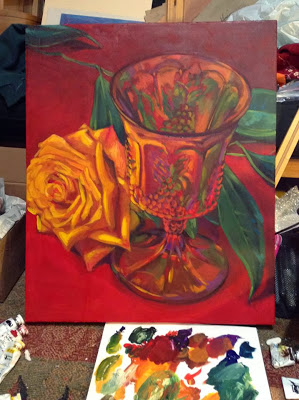
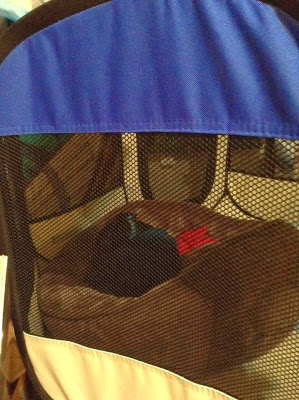
And throughout the process, my 18-week Miniature Pinscher puppy, Oliver, slept in his ex-pen!
The final painting, to be named soon! If you want to help me name it,
become my facebook friend and enter your suggestion!
https://www.facebook.com/AbandurkaART

Stacked! Step-by-Step
Step by step process in photography of my painting, "Stacked"
Read More